How to invite your guests: the complete guide
One walkthrough of the whole invitation process: picking an RSVP mode, designing your emails, choosing recipients, sending invitations or tickets, and tracking every send afterward.
Inviting your guests touches a few different screens: picking how they'll respond, designing what they receive, choosing who gets it, and sending. This guide walks through the whole thing in order, so you can follow along the first time and come back to any section later.
What's in this guide
- Before you start
- Open the Invite Hub
- The three RSVP modes
- Design your emails
- Choose your recipients
- Invitations or tickets
- Missing emails and other warnings
- Review and send
- Track every send
- Manage your templates
- If something goes wrong
Before you start
A few things need to be true before you can invite anyone:
- Your plan needs to include email invitations. If the button is locked, the pricing page shows what unlocks it.
- Your chart's RSVP mode needs to be Public RSVP or Digital Ticket & QR Entry. With Manual Management Only, there's no page for a guest to respond to, so there's nothing to email them about.
- Your guests need email addresses saved on their seats. That's the only place recipients come from, so it's worth a quick check of your guest list first.
Open the Invite Hub
Once you've added guests to your chart, a Set up invitations button appears on the canvas as your natural next step.
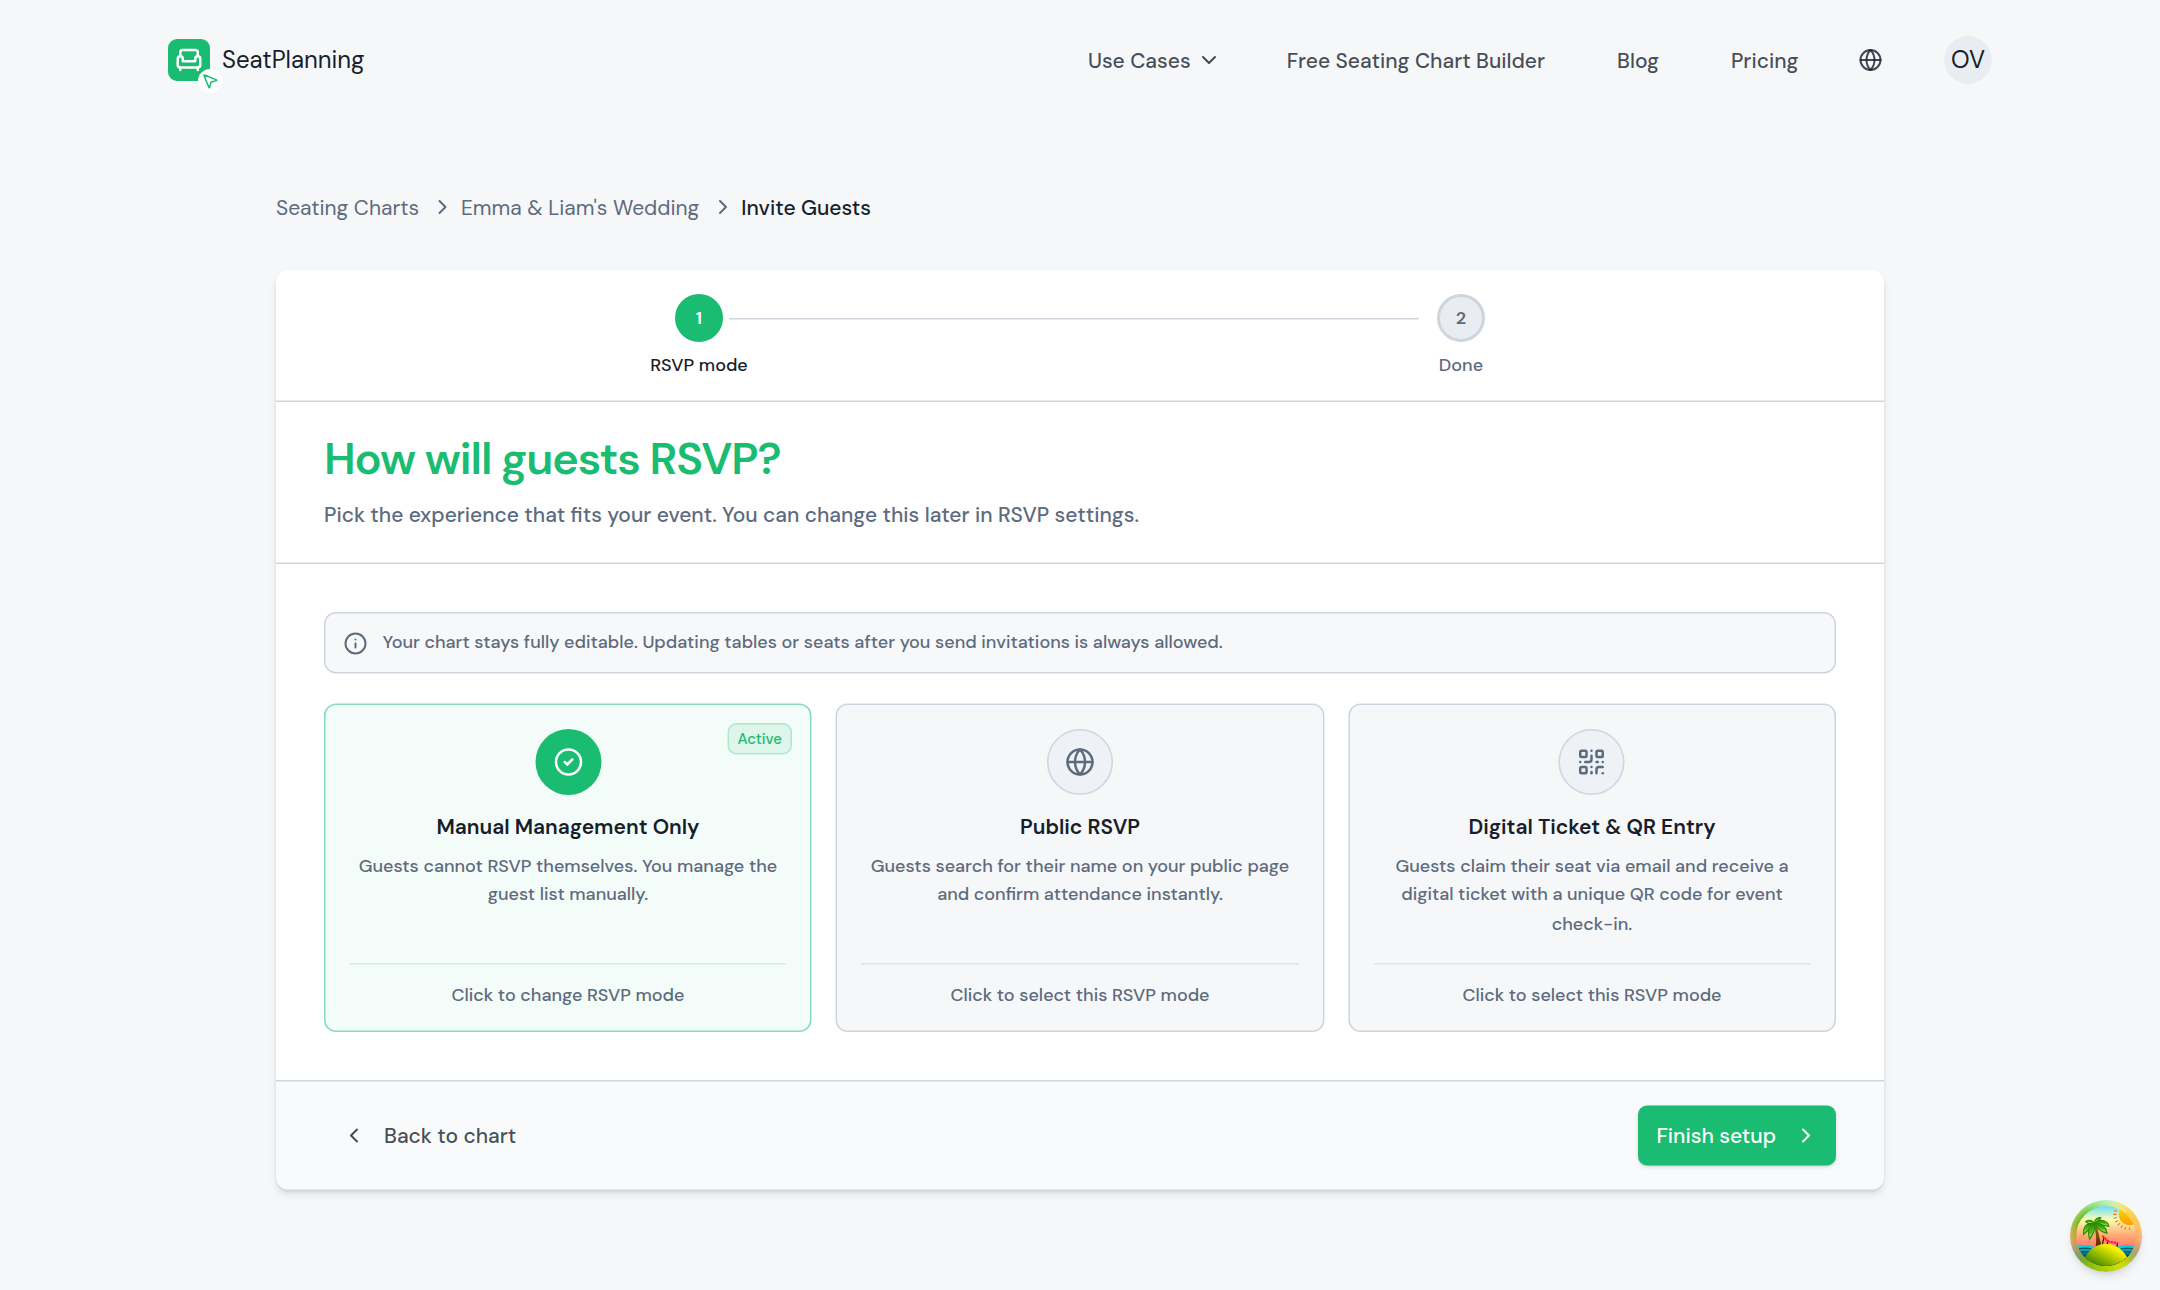
- 1Step 1 of the hub: choose how guests respond.
- 2Pick a mode: Manual Management Only, Public RSVP, or Digital Ticket & QR Entry.
- 3Finish setup, then design and send your emails.
The hub walks you through, in order: picking your RSVP mode, optionally customizing your RSVP or claim page, and then handing you off to the email wizard covered in the rest of this guide. If you'd rather skip straight to composing an email, there's a direct shortcut for that too. Either way you land in the same place. For the hub's own step-by-step detail, see The Invite Hub, step by step.
The three RSVP modes
What you pick here changes everything downstream, so it's worth understanding the three options before you go further.
- Manual Management Only. No public page, no invitations. You track who's coming yourself. Nothing in the rest of this guide applies until you switch to one of the other two modes.
- Public RSVP. Guests open a shared link, search for their name, and confirm or decline themselves. Everyone gets the same link, whether you email it to them or share it another way.
- Digital Ticket & QR Entry. Guests get a personal claim link by email. Once they claim their seat, they automatically receive a digital ticket with a QR code, which you scan at the door on the day.
You can switch modes any time from your chart's RSVP settings, and SeatPlanning asks you to confirm since the change is visible to guests right away. For the full comparison, see Choosing an RSVP mode. The rest of this guide covers the email wizard, which works a little differently depending on which of these two modes you're in, most noticeably at the recipients step below.
Design your emails
Every chart works with two separate emails, shown side by side when you open the email wizard's Design Emails tab:
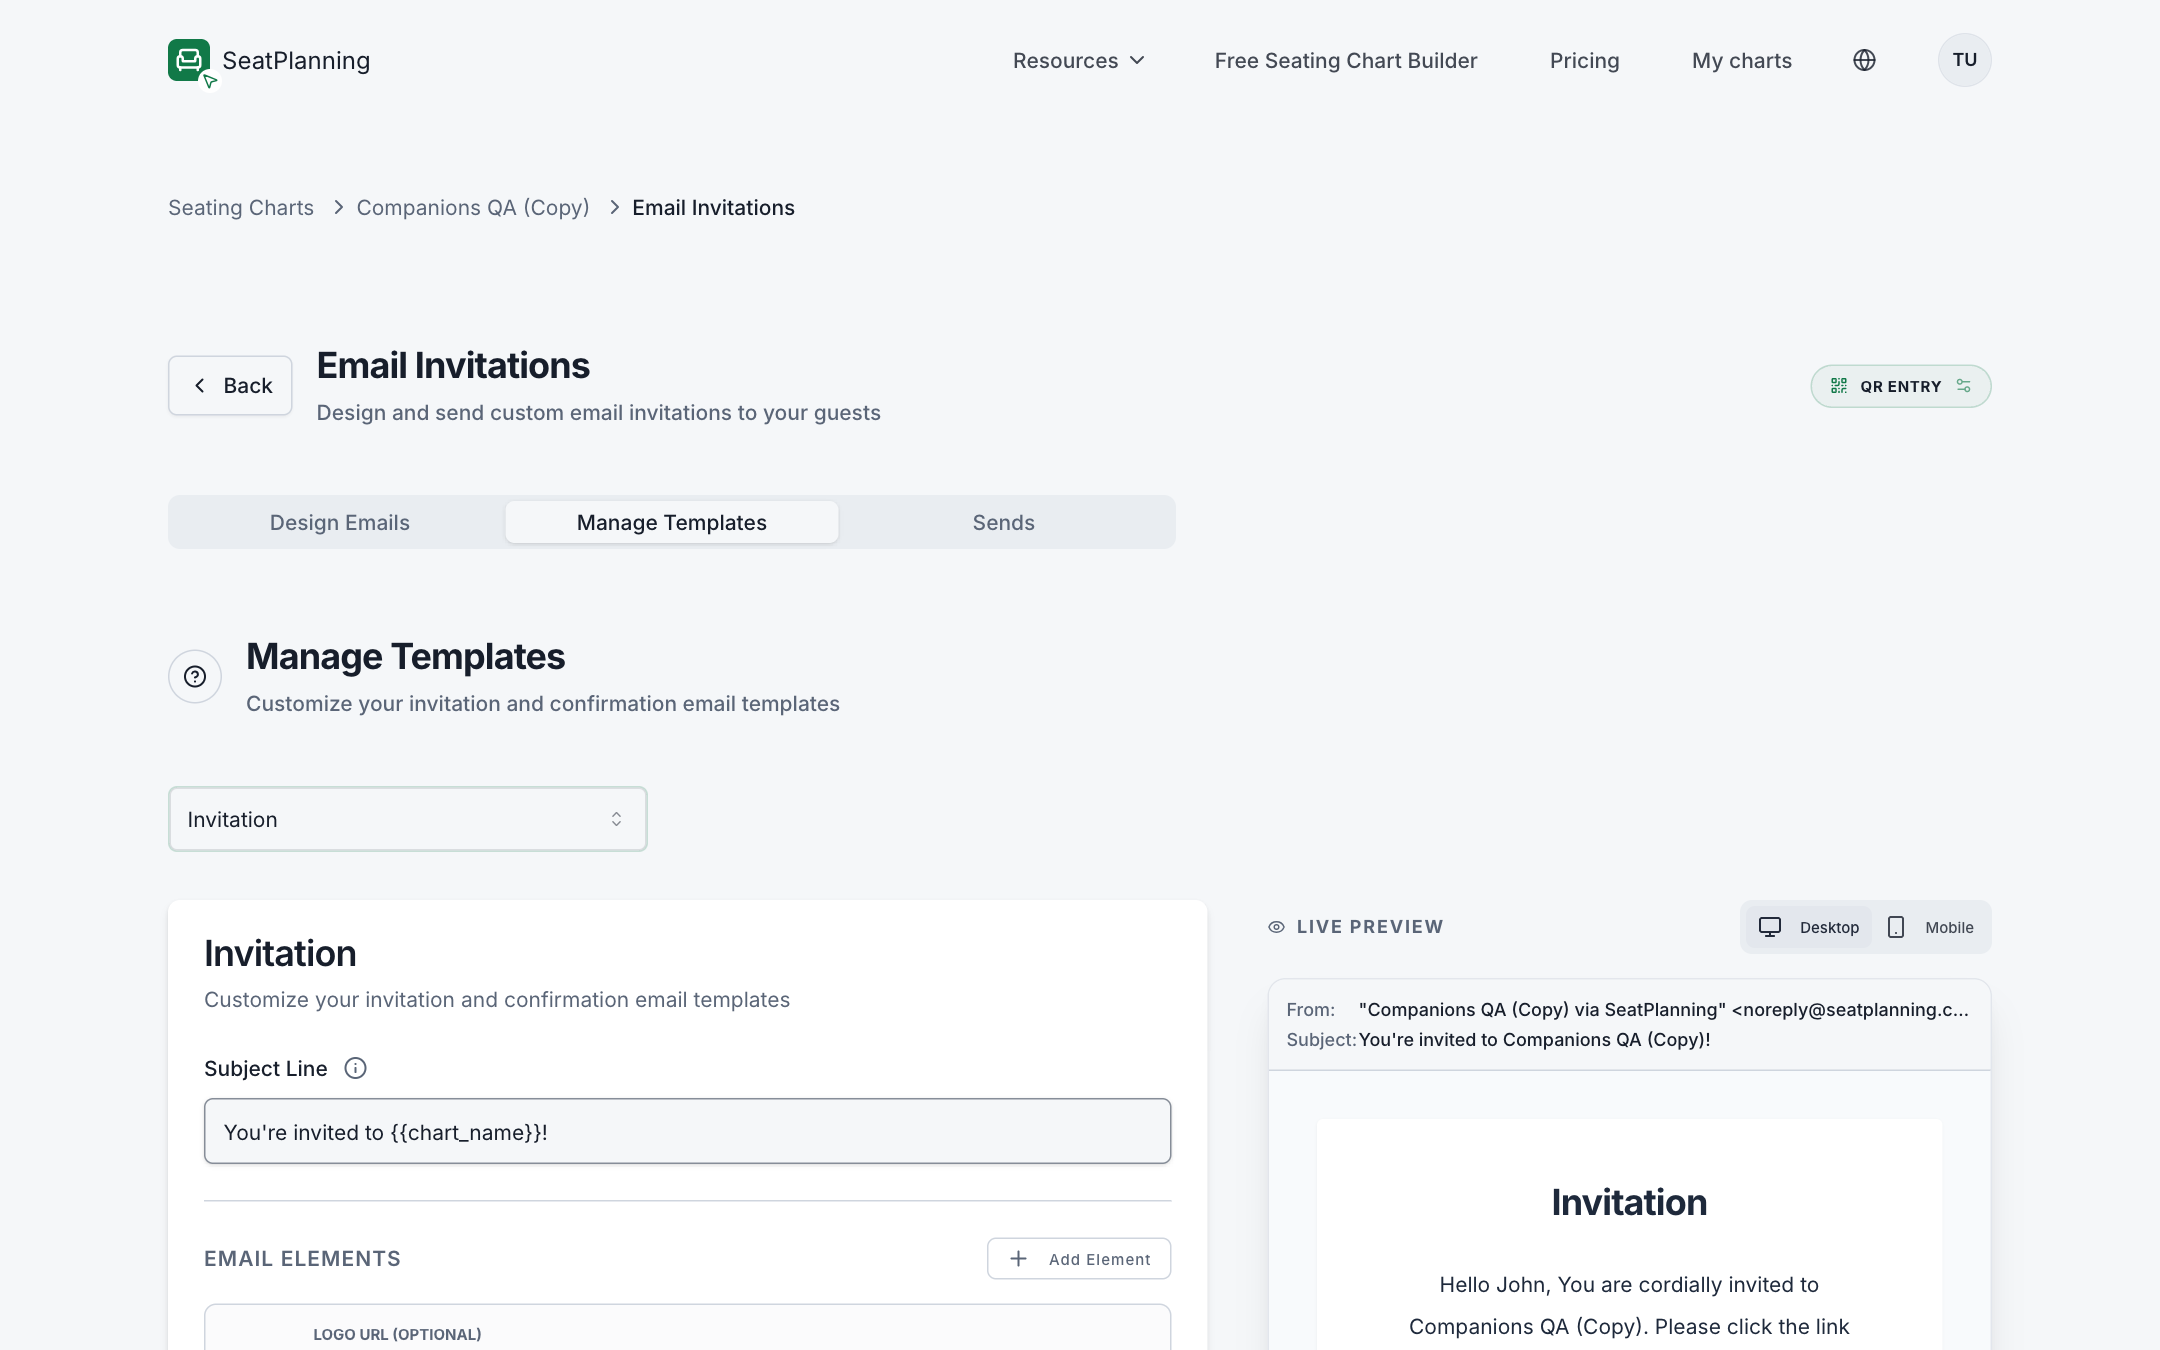
- 11. Invitation: sent the moment you hit send.
- 22. Confirmation: sent automatically once a guest claims their seat, carrying their QR ticket.
- Invitation. Sent when you send invitations from this wizard. It invites the guest and links them to their seat.
- Confirmation. Sent automatically the moment a guest claims their seat. It's only relevant in Digital Ticket & QR Entry mode, since that's the email that carries the guest's QR ticket. In Public RSVP mode there's nothing to claim, so this template is not used.
Both are built the same way, from a subject line and a stack of reorderable blocks: a logo, a heading, body text, a call-to-action button, and any extra text or button groups you add.
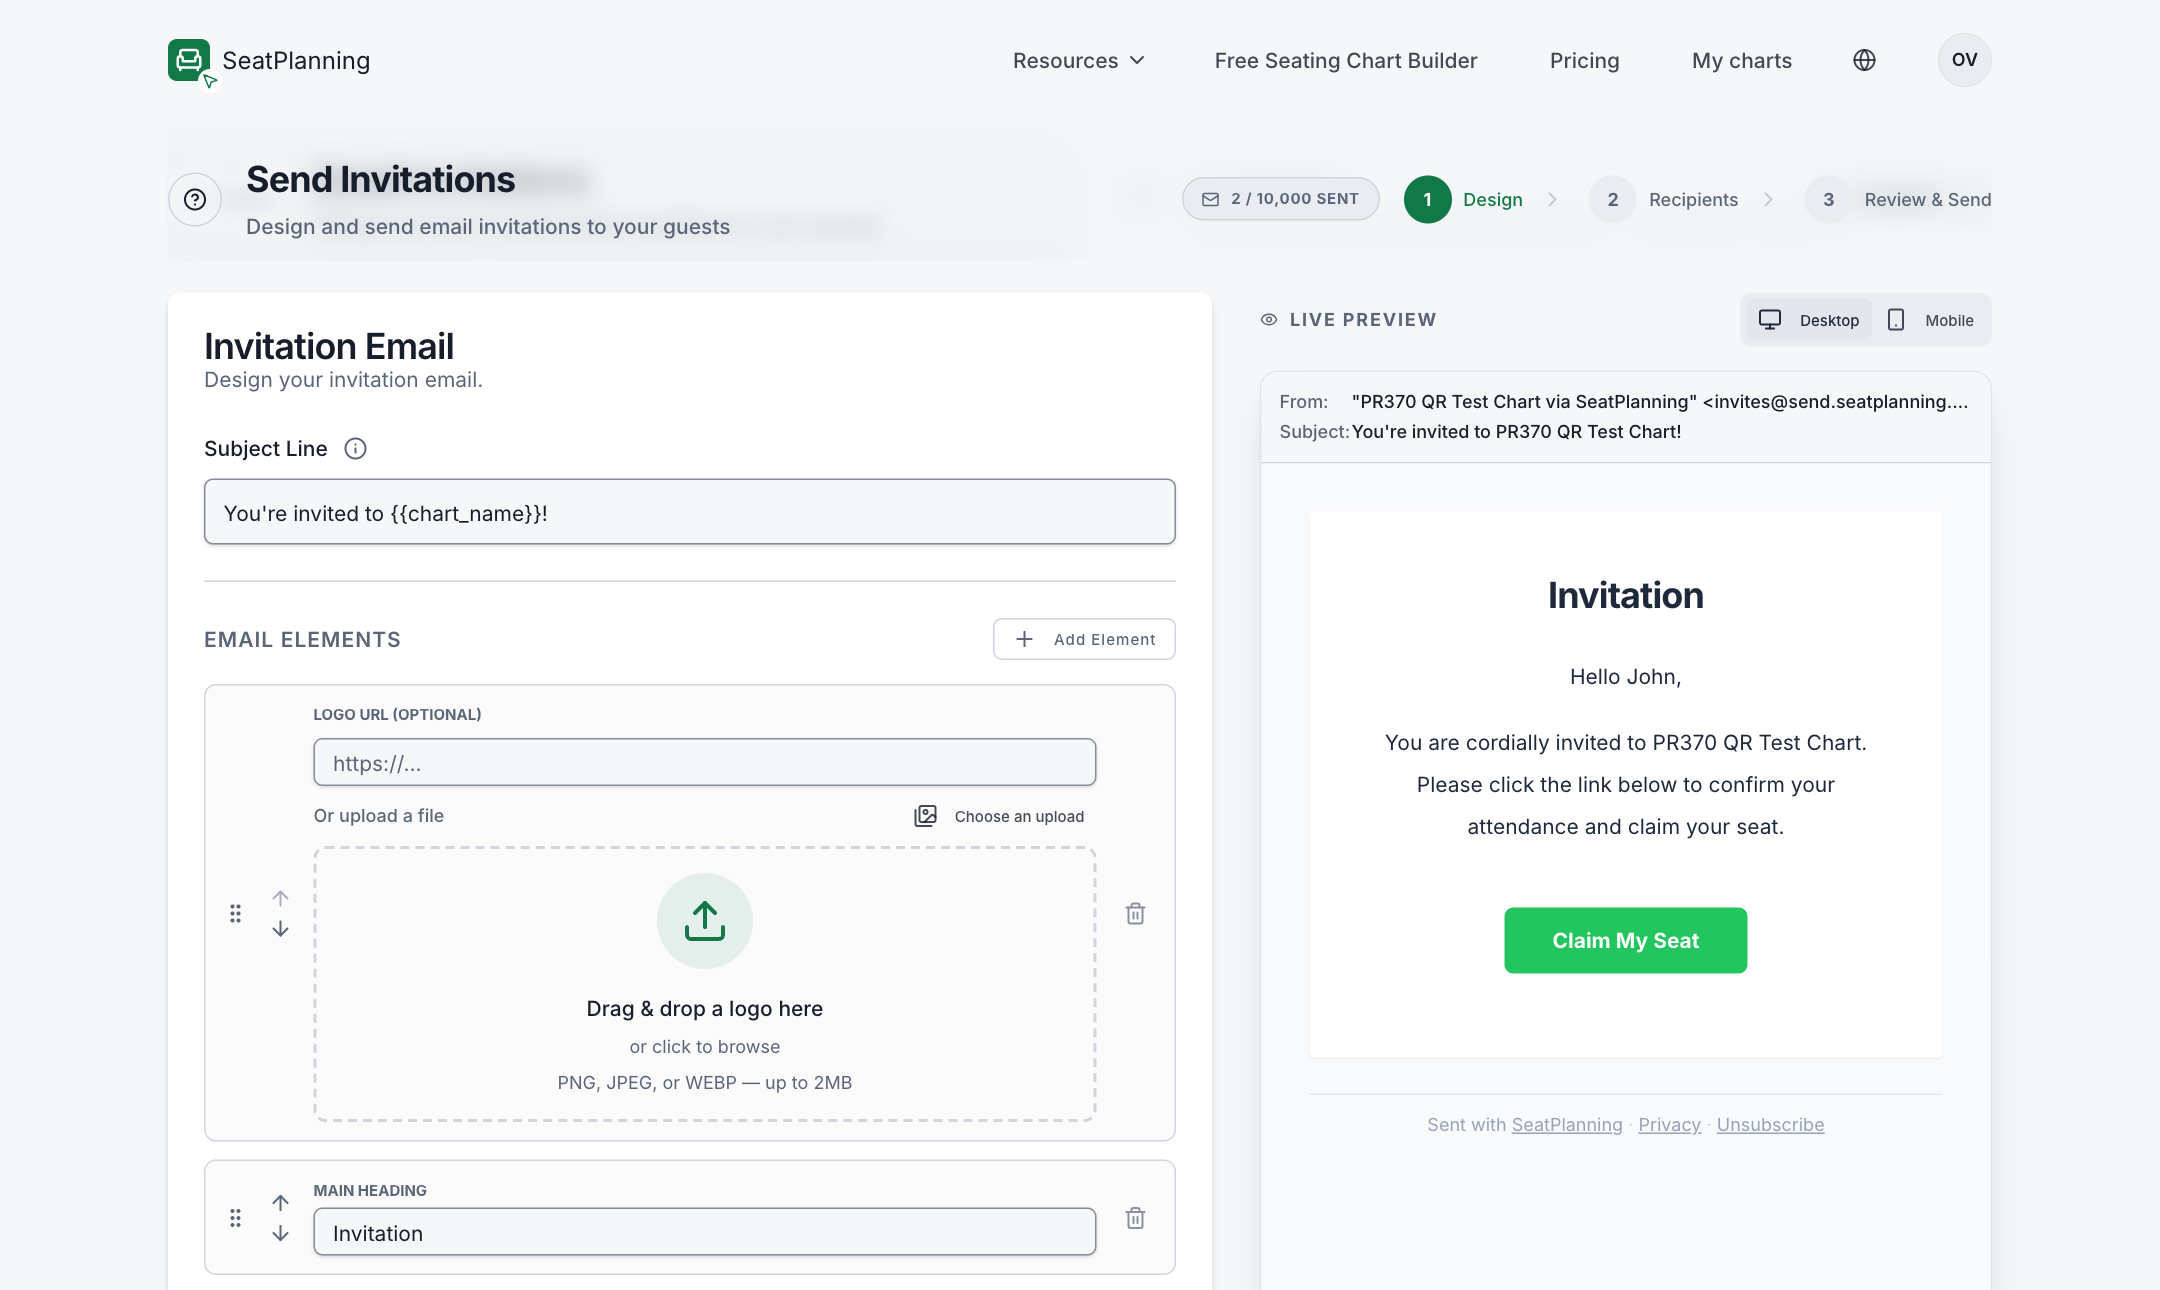
- 1Set the subject line guests see in their inbox.
- 2Add a logo by URL or upload.
- 3The live preview shows exactly what a guest receives.
A few things worth knowing:
- Merge tags like the guest's name, the chart name, and their personal RSVP or claim link drop into any text field and fill in automatically for each guest when the email sends.
- Colors and alignment are set once and apply to the whole email: brand color, text colors, background, and card background.
- Only the chart owner can edit templates. Collaborators with edit access can still compose and send using whatever template is saved, but can't create or change one.
Continuing from the design step takes you into the compose view with the live email preview alongside your edits:
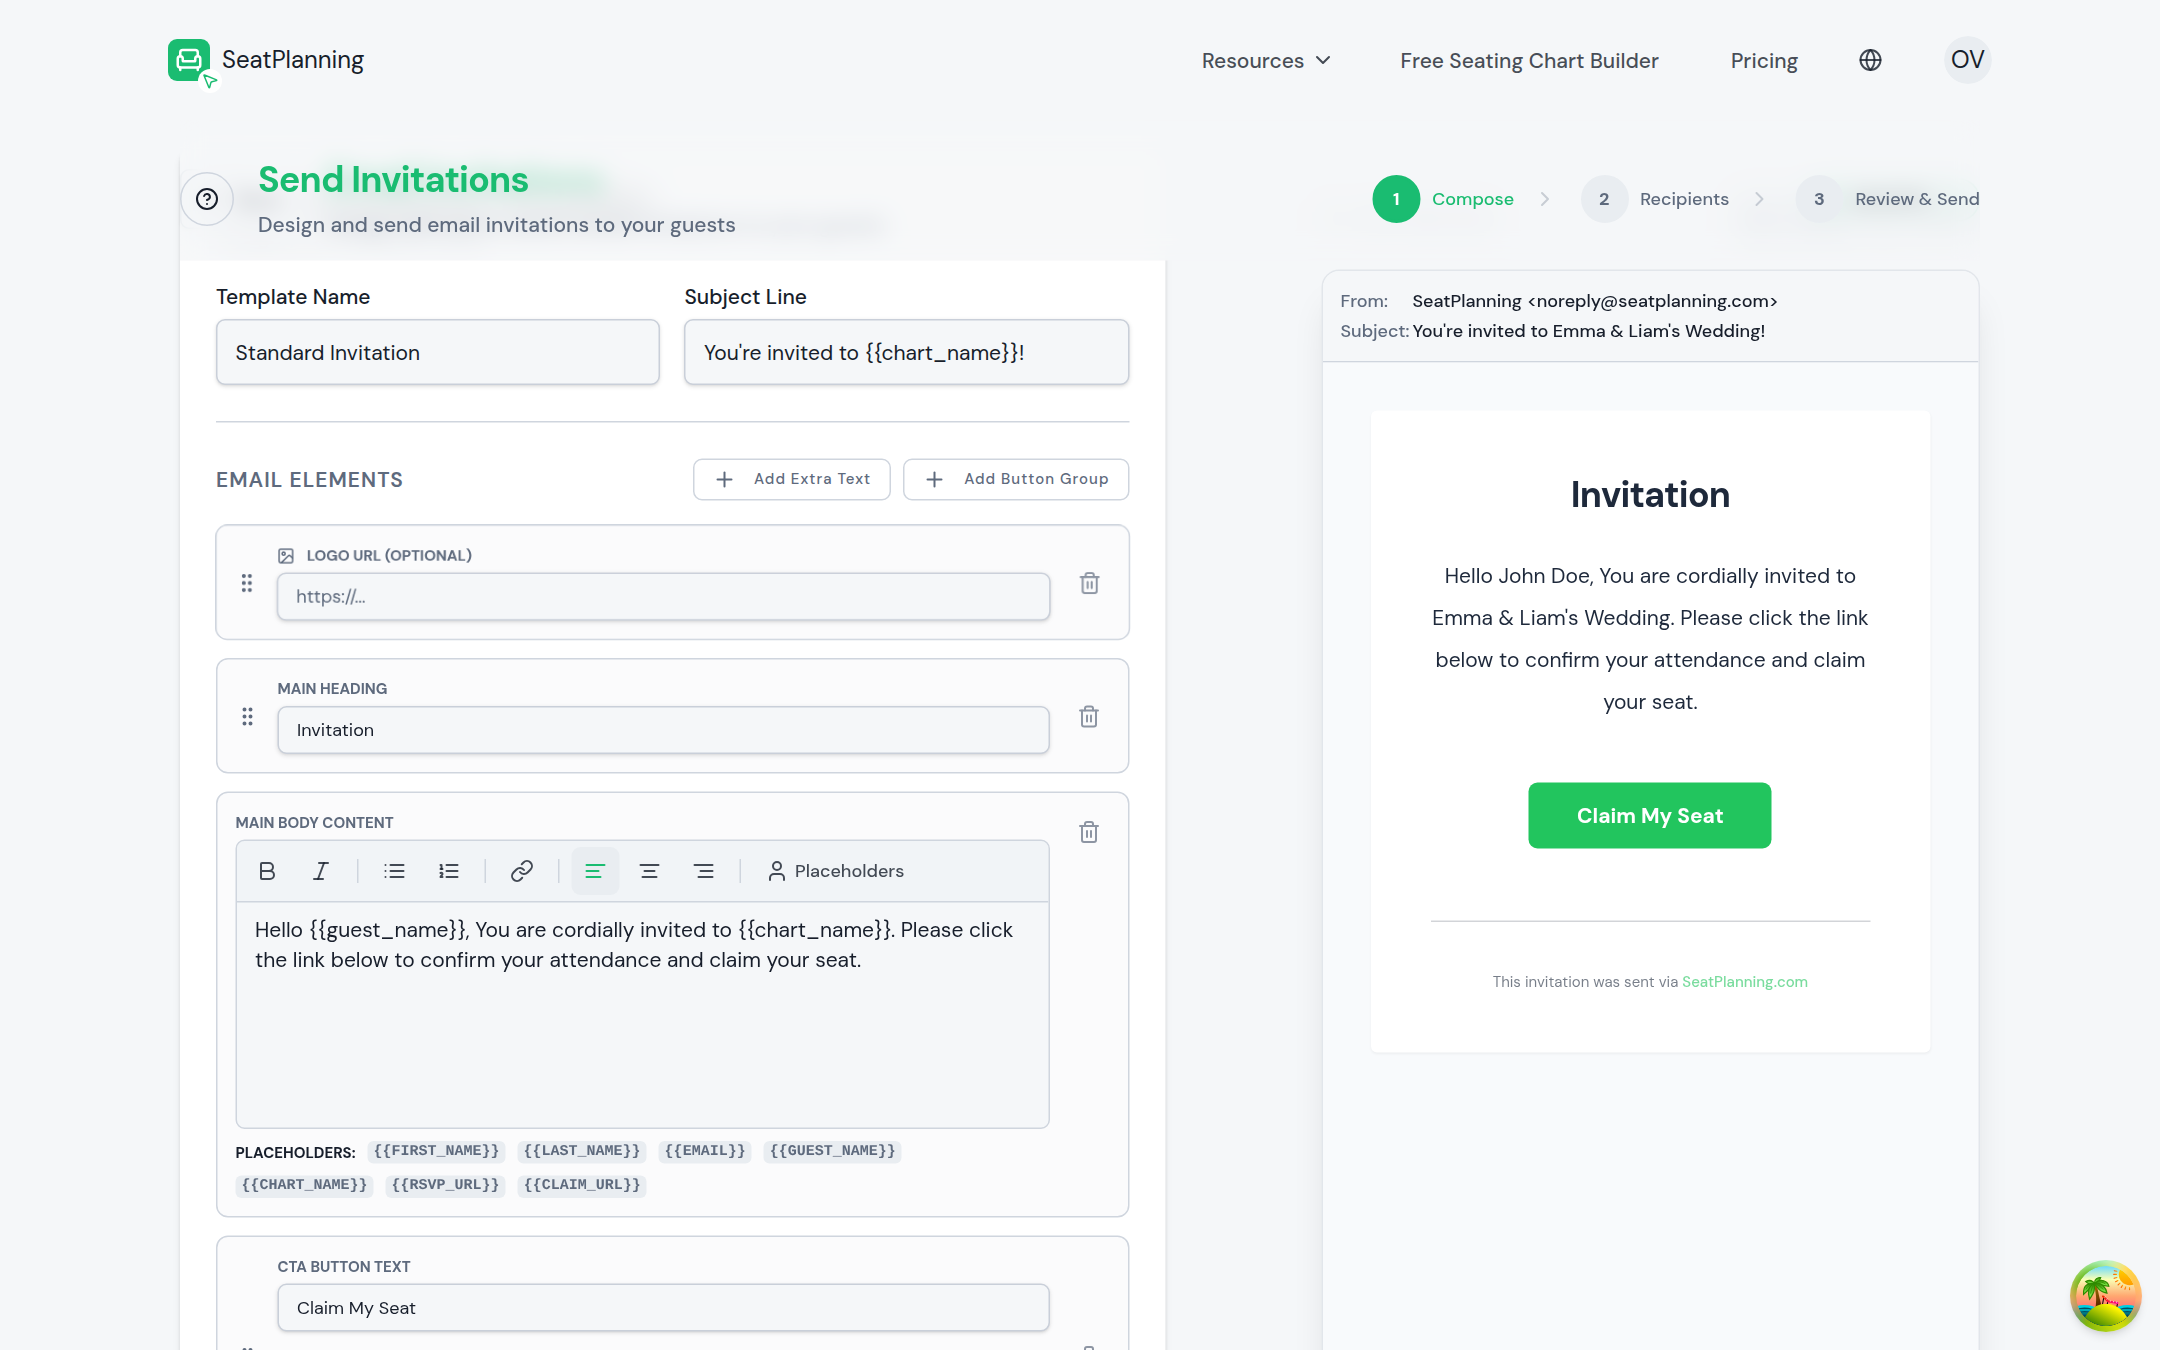
- 1Track your progress through Design, Recipients, and Review & Send.
- 2Name your template and set its subject line.
- 3Watch the live preview update as you edit.
If your chart uses Digital Ticket & QR Entry, this step also has an Invitation link expiry setting, controlling how long a guest's claim link stays valid once you send it. For the full set of design options and merge tags, see Design your invitation emails.
Choose your recipients
On the Recipients step, pick which group of guests should get this send:
- Unassigned Seats: guests who aren't placed at a table yet.
- Seats on Tables: guests already assigned to a table in your layout.
Each option shows how many seats qualify. You send to one group at a time, so repeat the wizard for the other group if you want to reach everyone in a single day.
In Public RSVP mode, everyone gets the same shared link no matter who you pick here. In Digital Ticket & QR Entry mode, this step looks a little different, because you also choose what to send.
Invitations or tickets
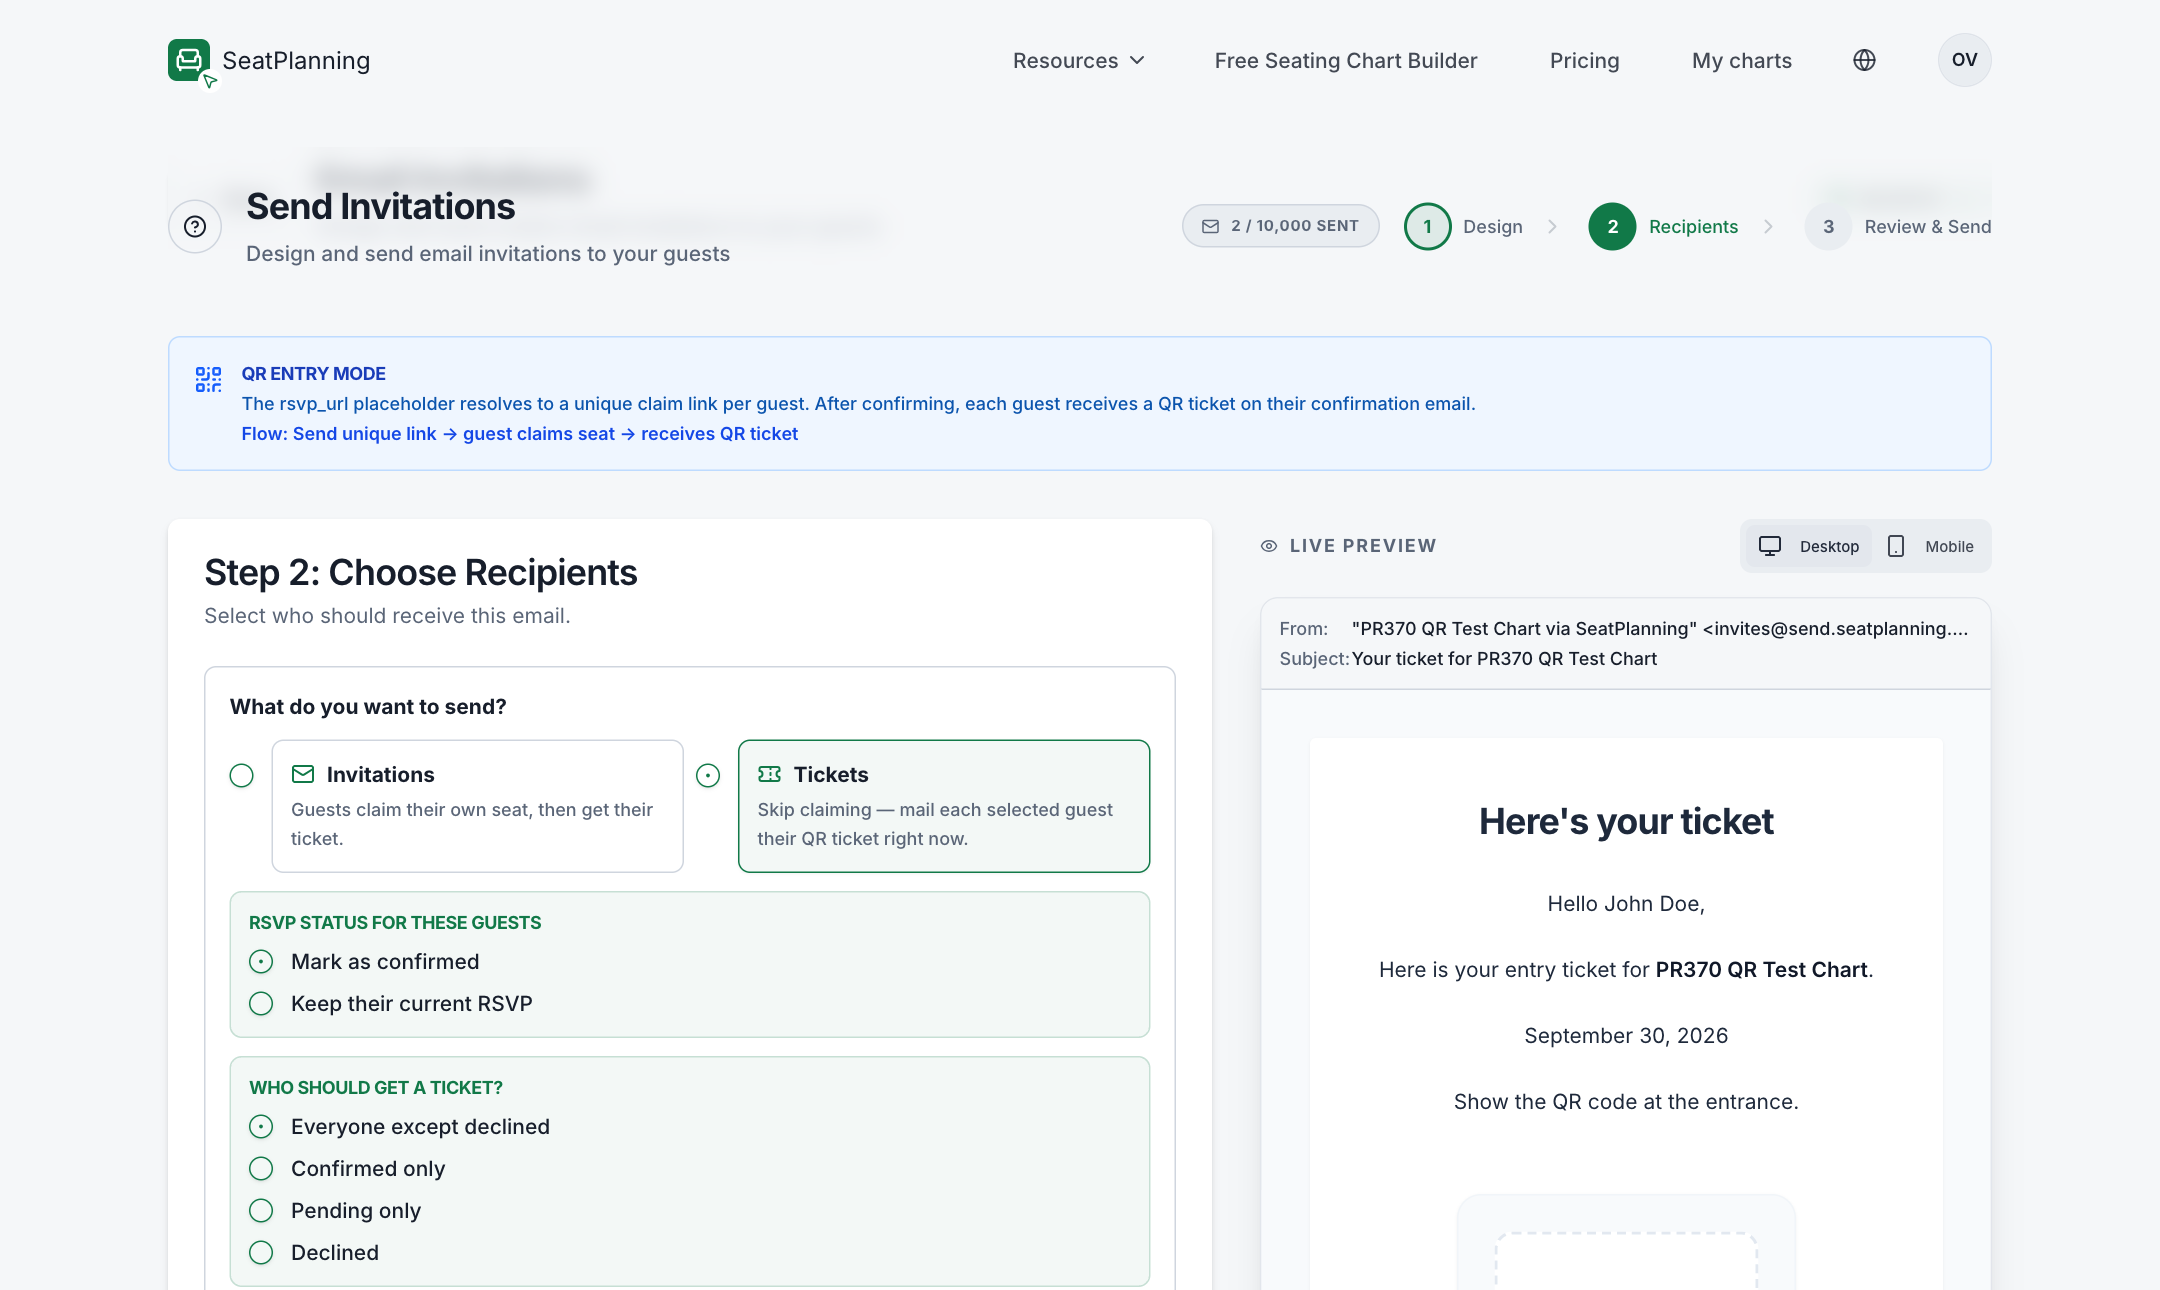
Digital Ticket & QR Entry mode gives you a choice at the top of the Recipients step:
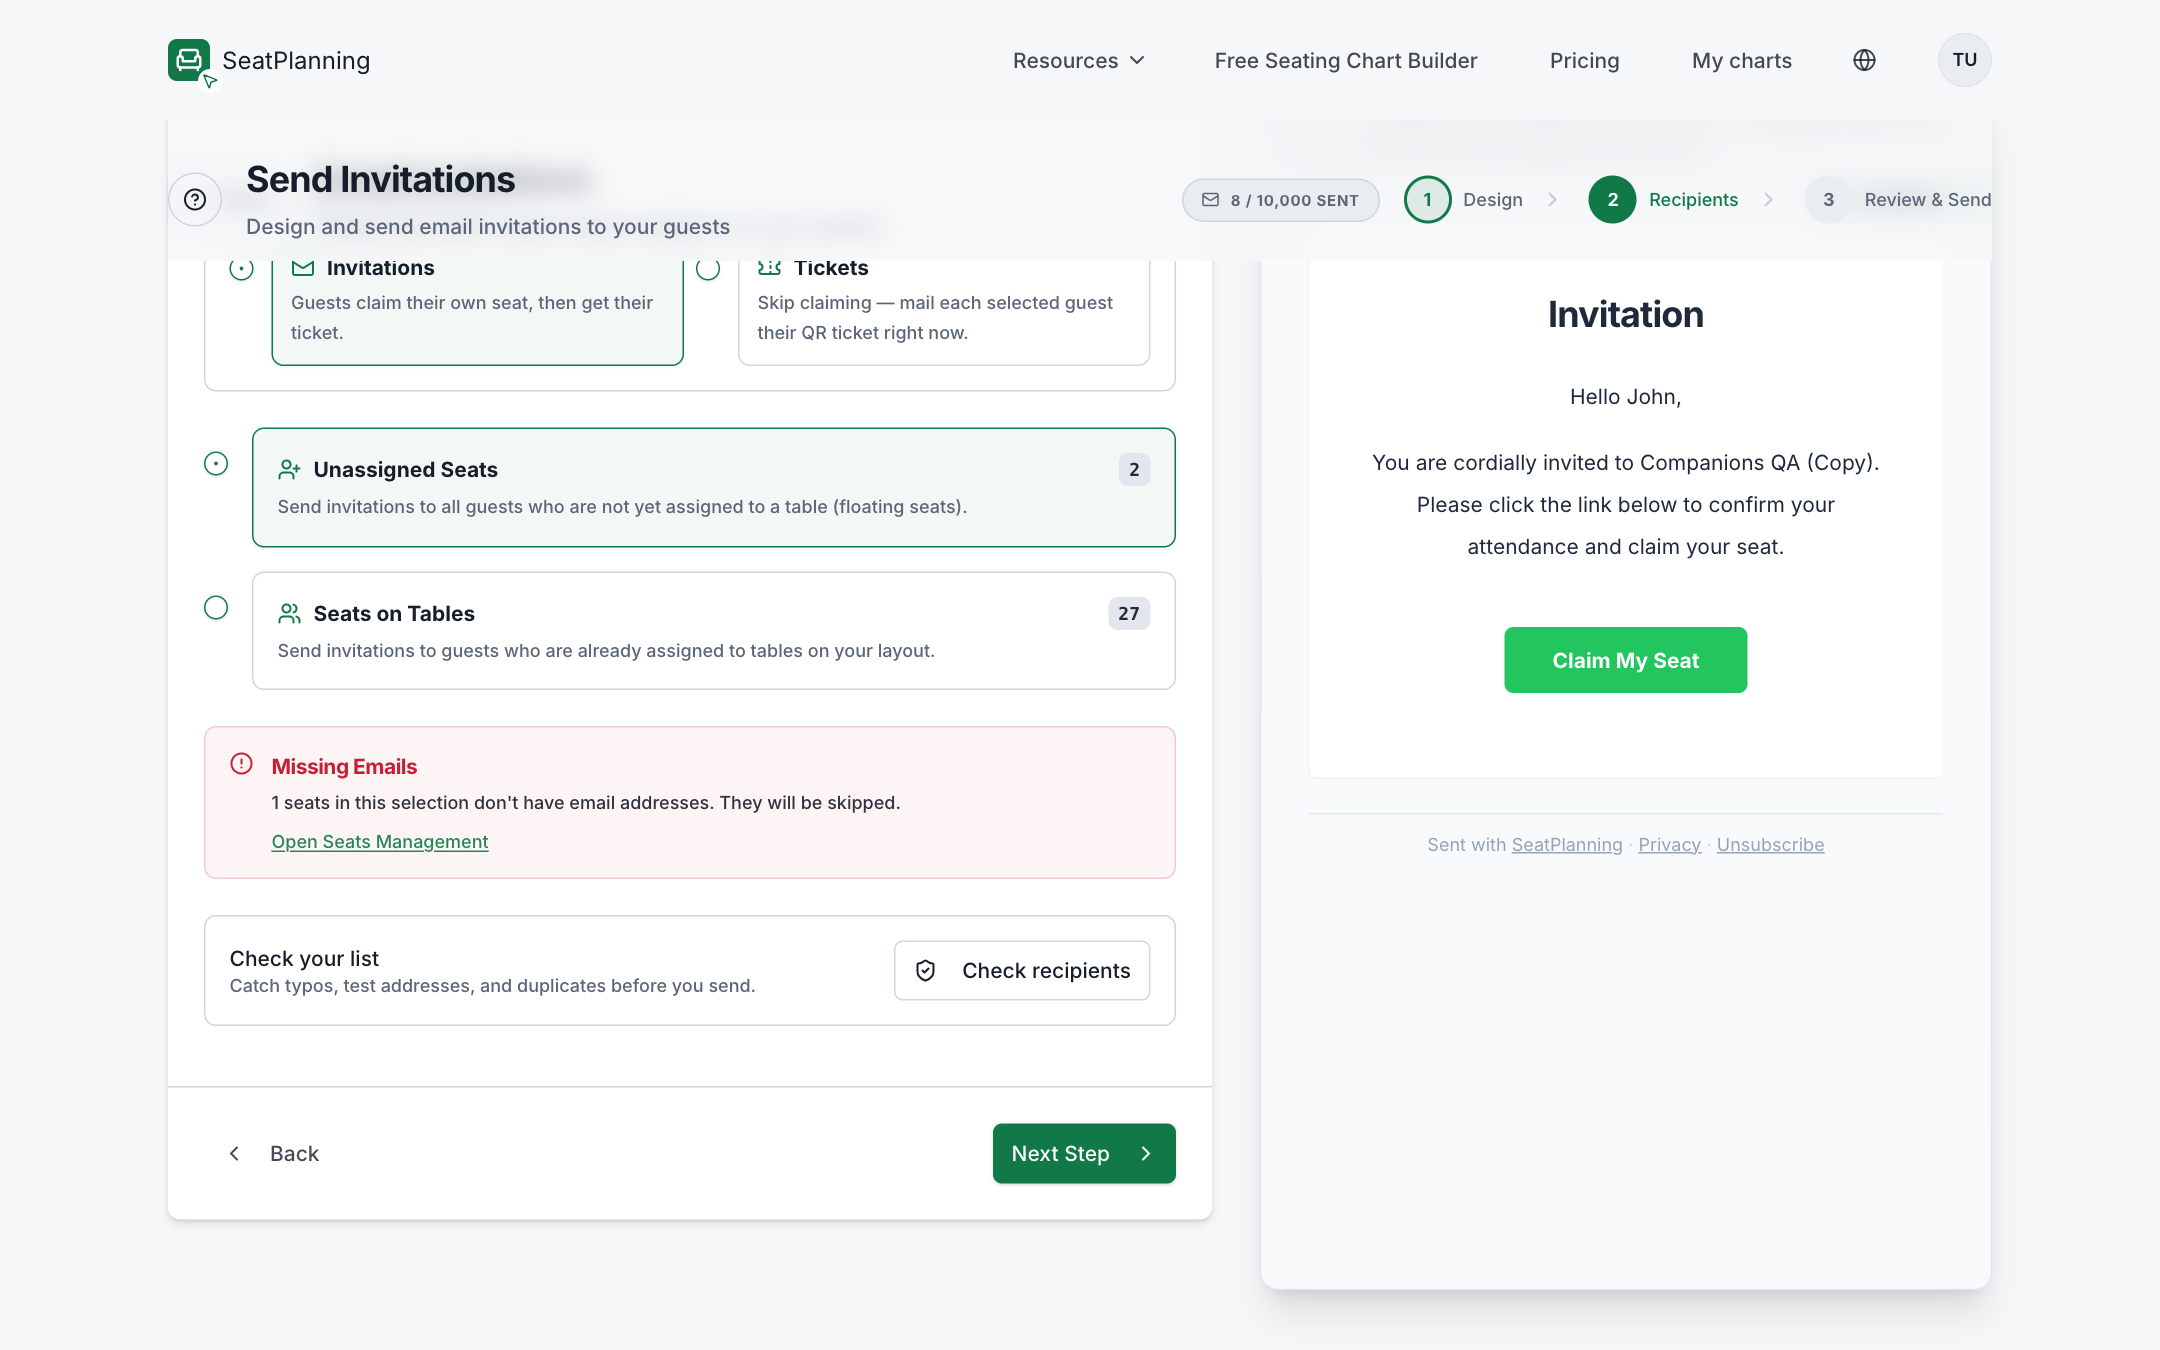
- 1Invitations: guests claim their own seat, then get their ticket.
- 2Tickets: skip claiming and mail each selected guest their QR ticket right now.
- 3Missing Emails warns you how many seats will be skipped.
- Invitations is the standard flow: the guest opens their link, claims their seat, and their ticket follows automatically by email.
- Tickets skips the claiming step entirely and mails each selected guest their QR ticket right away. This is useful when you already know exactly who's attending and don't need them to confirm first. It's available on higher-tier plans.
Choosing Tickets adds two more choices: whether to mark these guests as confirmed or leave their current RSVP status alone, and which guests are eligible based on their current RSVP status (everyone except declined, confirmed only, pending only, or declined, with a warning if you pick declined guests on purpose).
Missing emails and other warnings
Two checks run on this step to help you send a clean list.
Missing Emails. If any seats in your selection don't have an email address saved, a warning tells you how many will be skipped and links straight to Open Seats Management so you can fill them in before sending.
Check recipients. Select Check recipients to scan your list for problems before you send: invalid addresses, likely duplicates, addresses that look like a typo of a common provider (with a one-click fix), test or disposable addresses, and role addresses like info@ or admin@. Anything flagged can be fixed inline or excluded from just this send.
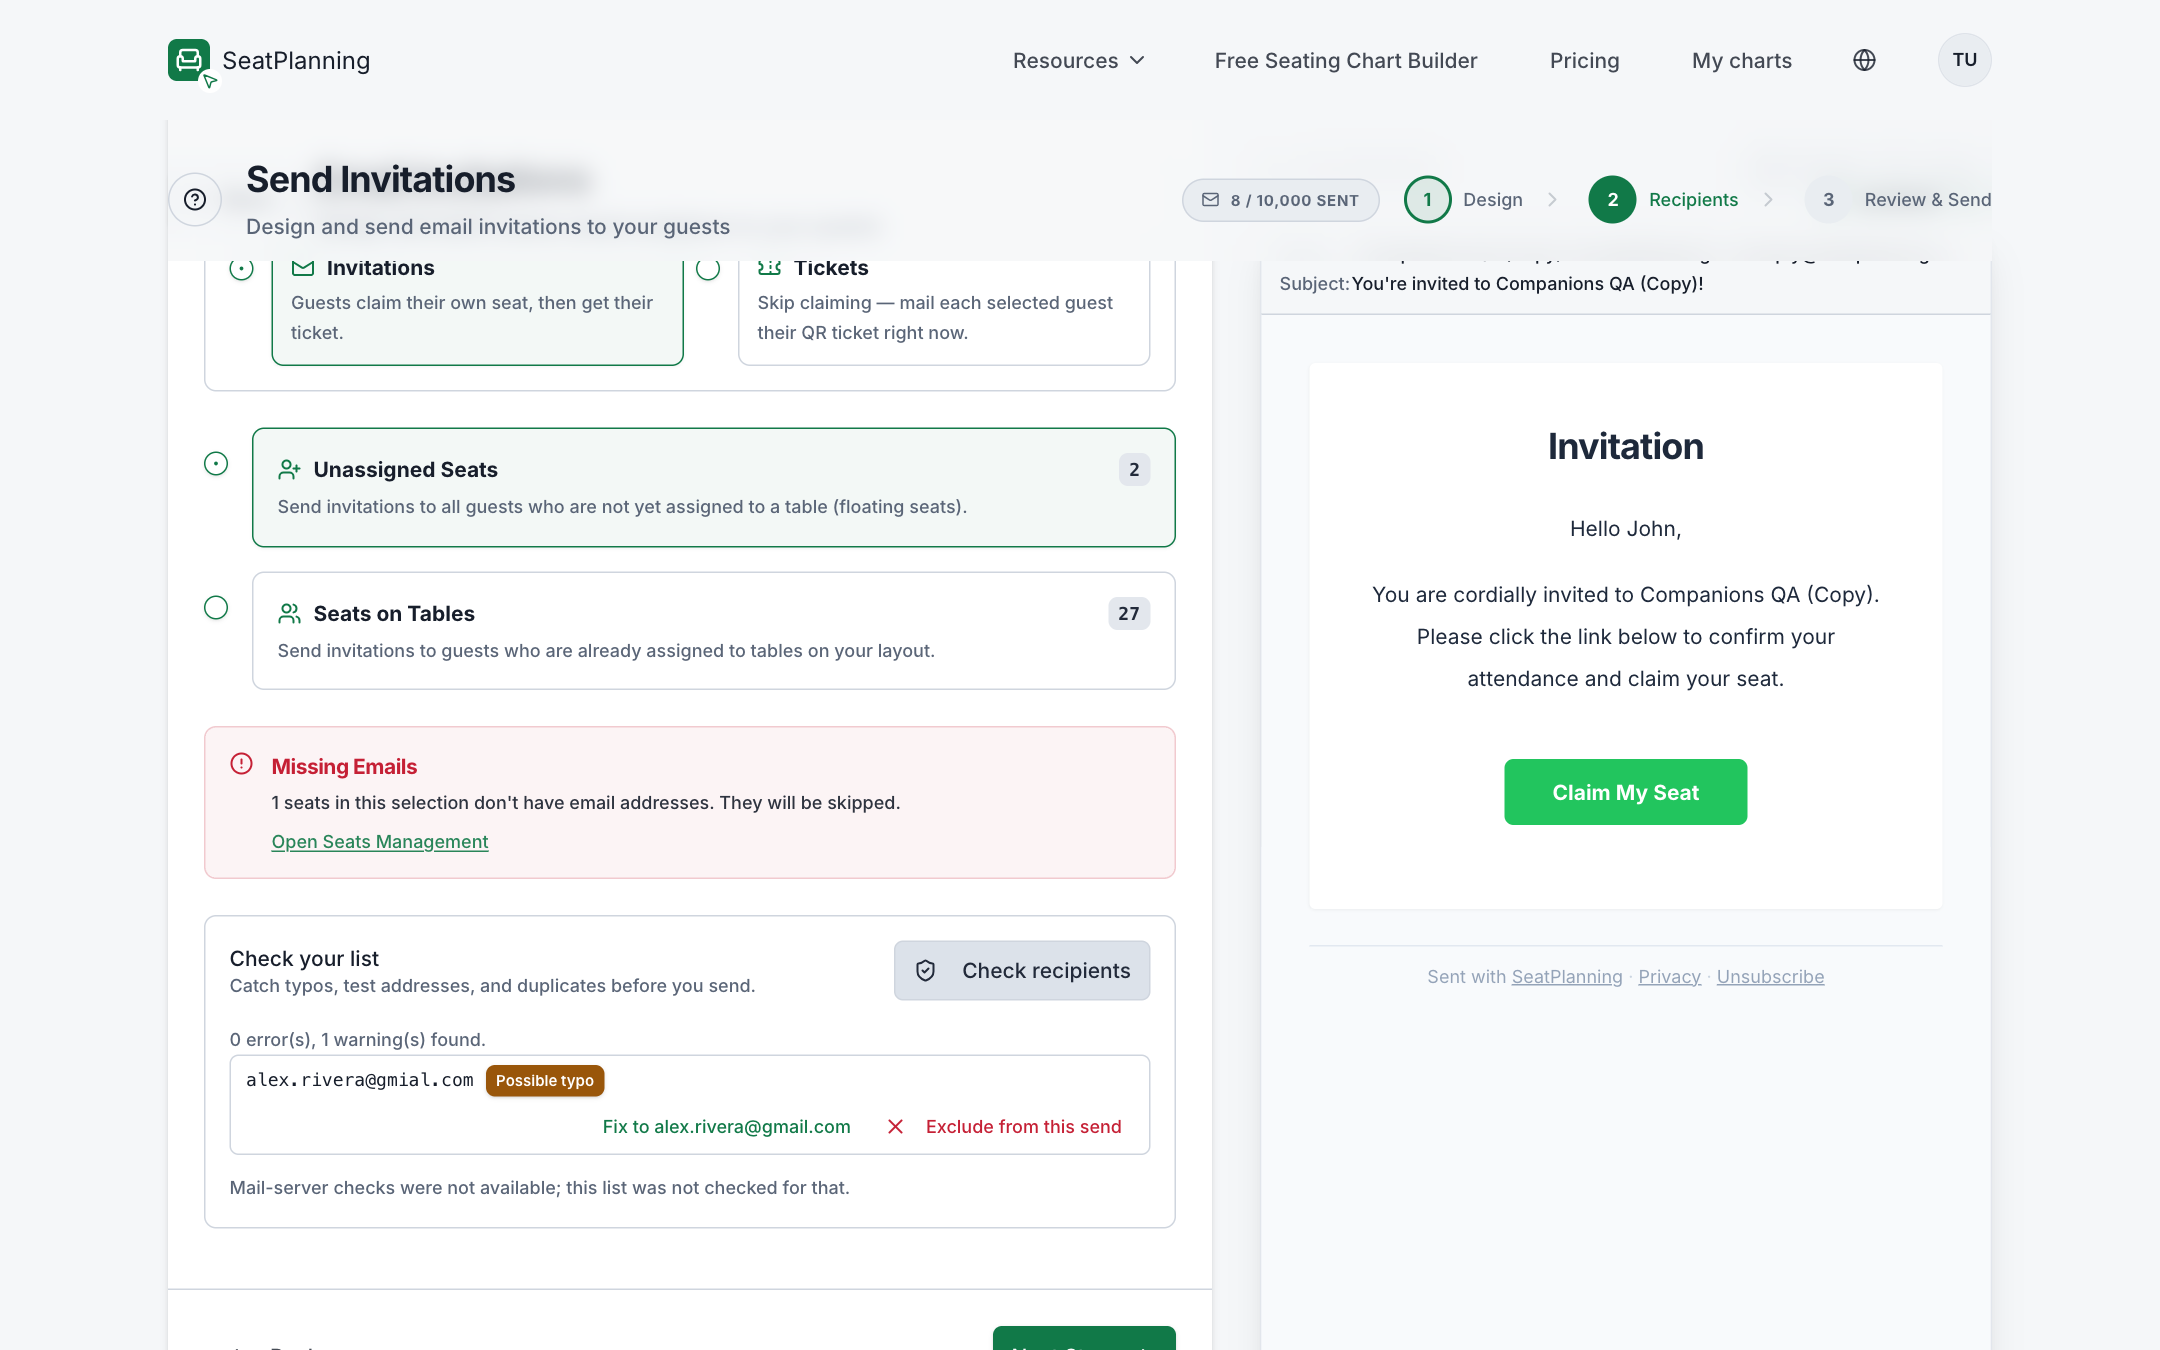
- 1A flagged address, with a one-click fix or the option to exclude it from this send.
If you've already sent to some of these guests before, the wizard also asks who this send is for: only guests not invited yet, or everyone in the list again, so you don't accidentally double-invite someone by mistake.
Review and send
The last step recaps everything before anything goes out: how many recipients, which template, the subject line, and exactly where the button in your email points.
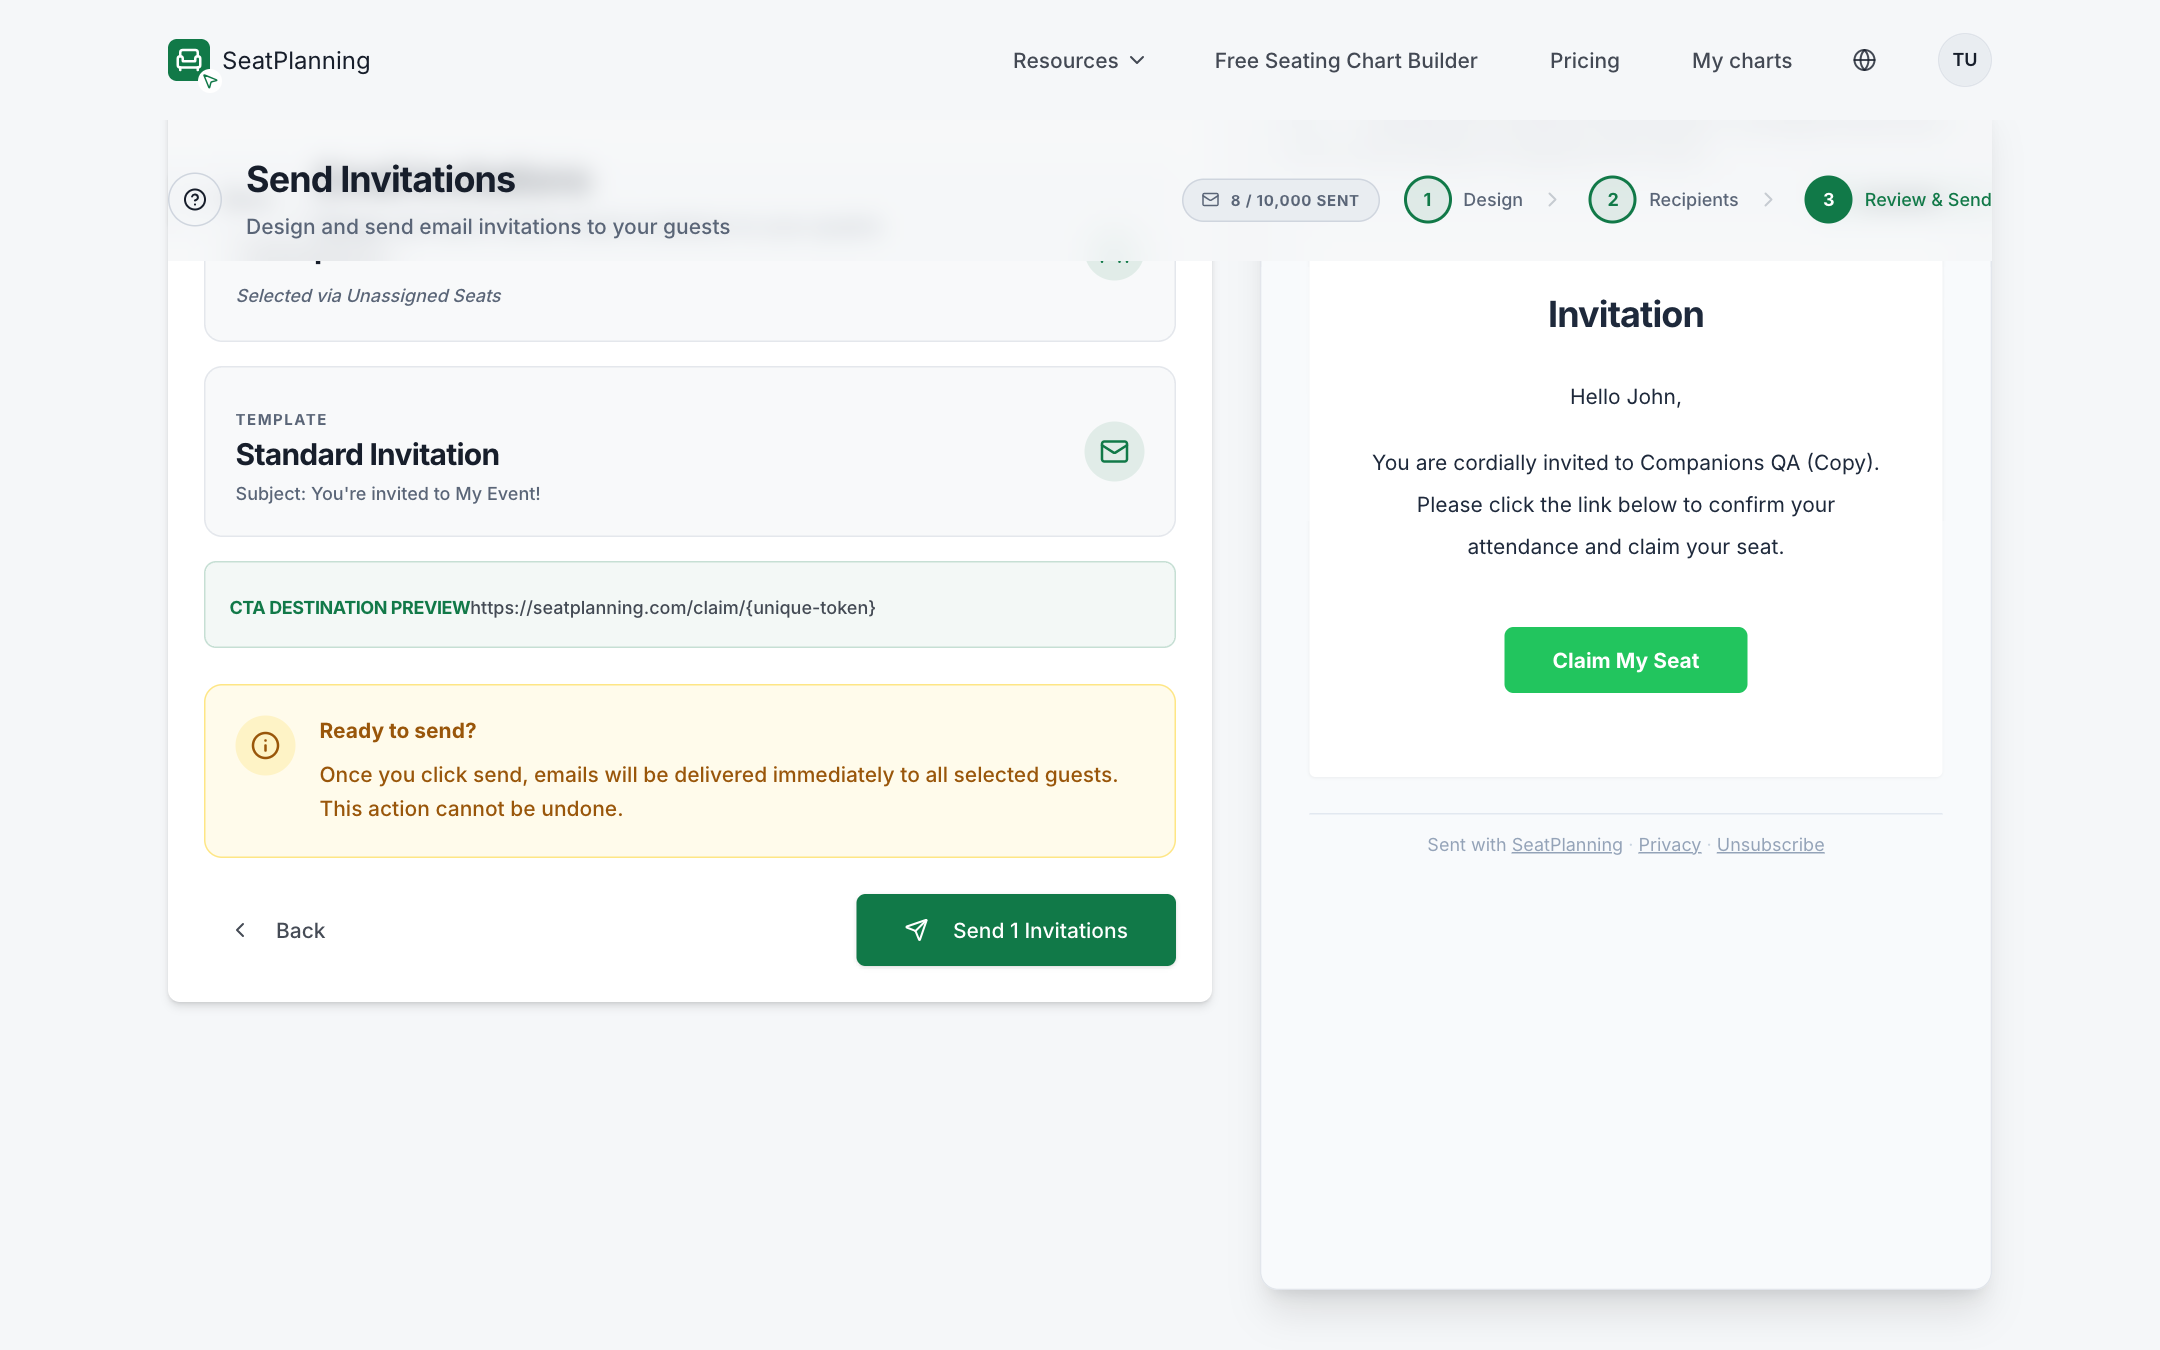
- 1The template and subject line this send will use.
- 2Where the button in the email actually leads.
- 3Sending is immediate and can't be undone, so give this a real look.
If your design doesn't have anything linking to the guest's RSVP or claim page, a warning blocks sending until you either fix the design or confirm you understand. Once everything checks out, select Send Invitations or Send Tickets to go.
Sending starts right away, so you're free to close the page and keep working. Larger sends may be spread across a few batches or days automatically to protect deliverability; the review step tells you if that applies before you confirm. See Email sending allowances if you're planning a large send and want to know what the limit messages mean.
Track every send
Every send you've made, past and in progress, lives on the Sends tab.
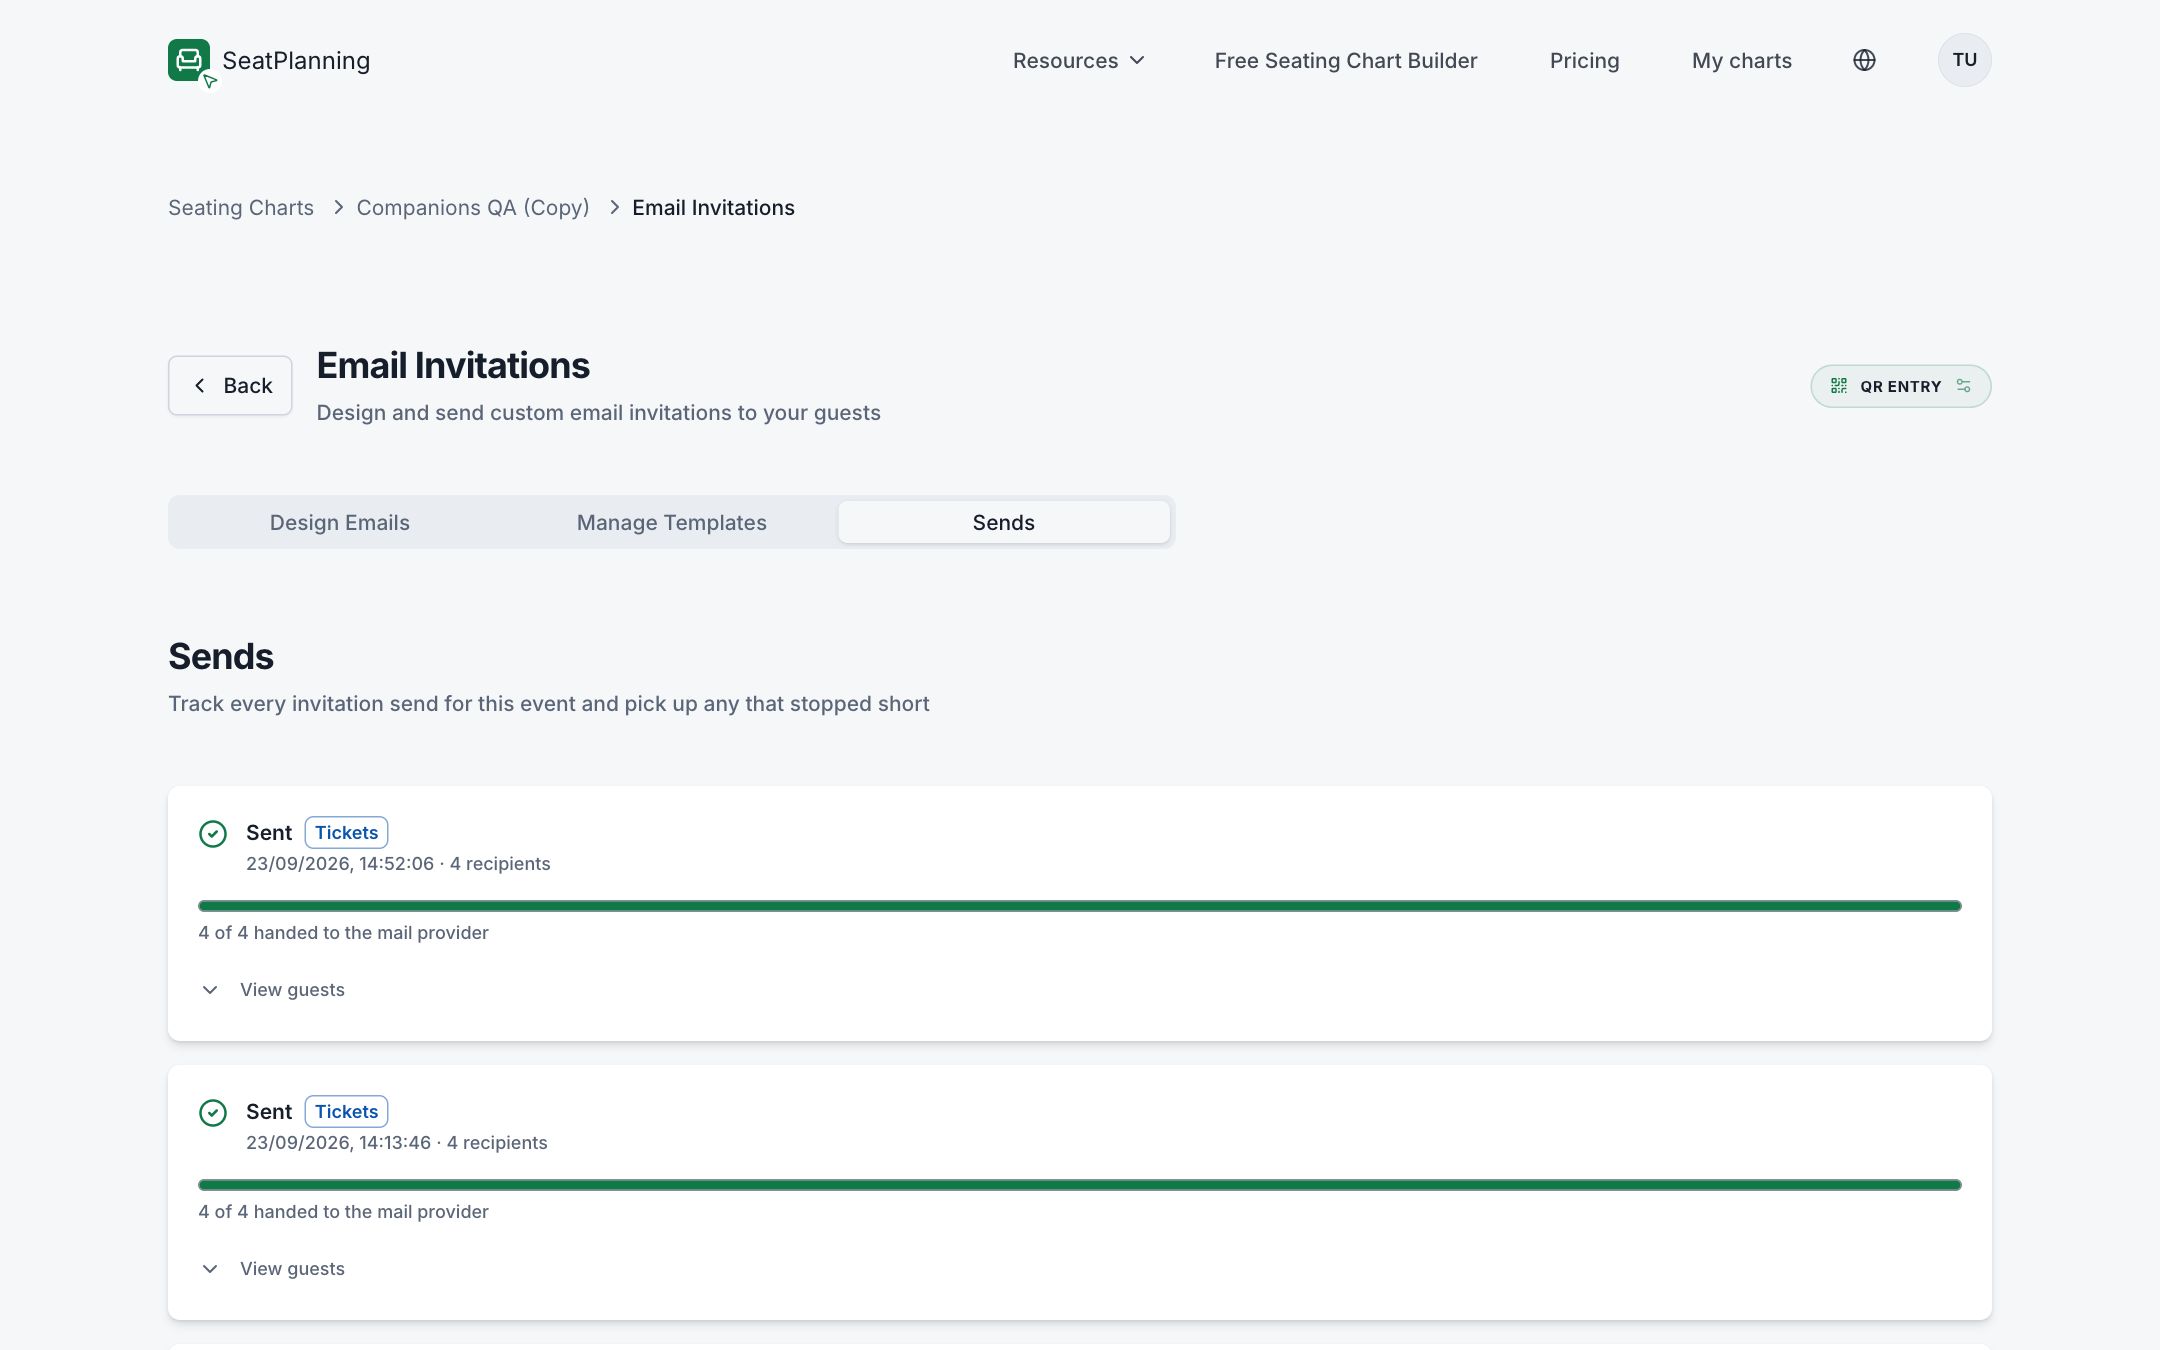
- 1Status and type: Sent, Scheduled, Stalled, plus a badge for ticket sends.
- 2A progress bar shows how many have been handed to the mail provider.
- 3View guests expands the per-recipient outcome for that send.
Each entry shows its status, how many recipients it covered, and a progress bar as delivery happens. Once delivery data comes in, you'll also see how many were delivered, bounced, or complained. If a send ever stops partway (for example, because a tab was closed mid-send), it shows as Stalled with a Resume button, and resuming never re-sends anything that already went out.
Manage your templates
The Manage Templates tab is the same editor from the Design step, but as a dedicated home for your saved templates outside of an active send.
Use the dropdown at the top to switch between Invitation and Confirmation, then:
- Save Template to store your current design under a name, so you can tell templates apart if you keep more than one.
- Load Template to bring a saved design back into the editor.
- Delete a saved template you no longer need, with a confirmation first since it can't be undone.
Changing a template only affects emails you send after saving. Anything already delivered keeps the design it had at the time.
If something goes wrong
- A guest says they never got anything. Start with A guest didn't get the invitation email: check spam first, then confirm the email address saved on their seat.
- You're not sure how many you can send. See Email sending allowances for what the monthly, per-send, and daily limit messages mean.
- Emails keep bouncing or getting marked as spam. See Deliverability: bounces, unsubscribes & spam for how SeatPlanning handles bad addresses and how to keep your list healthy.
- You want to know what each email actually says. See Emails your guests receive for the invitation, verification, and ticket emails guests can get, and when each one sends.
Where to go next
- Choosing an RSVP mode to compare all three modes in depth.
- Design your invitation emails for the full set of design options and merge tags.
- Track responses and filter your guest list to see who has replied after you send.