E-Mail-Einladungen versenden
Versende Einladungen direkt aus deiner Gästeliste in drei Schritten: Vorlage schreiben oder wählen, Empfänger auswählen und senden. Du kannst nur Gäste per E-Mail erreichen, die bereits auf deinem Sitzplan stehen.
E-Mail-Einladungen bringen deine RSVP- oder Ticket-Links zu den Gästen, ohne dass du eine einzige Adresse von Hand eintippst. Du wählst aus den Personen, die bereits auf deinem Sitzplan stehen, entscheidest, wie die E-Mail aussieht, und sendest sie ab.
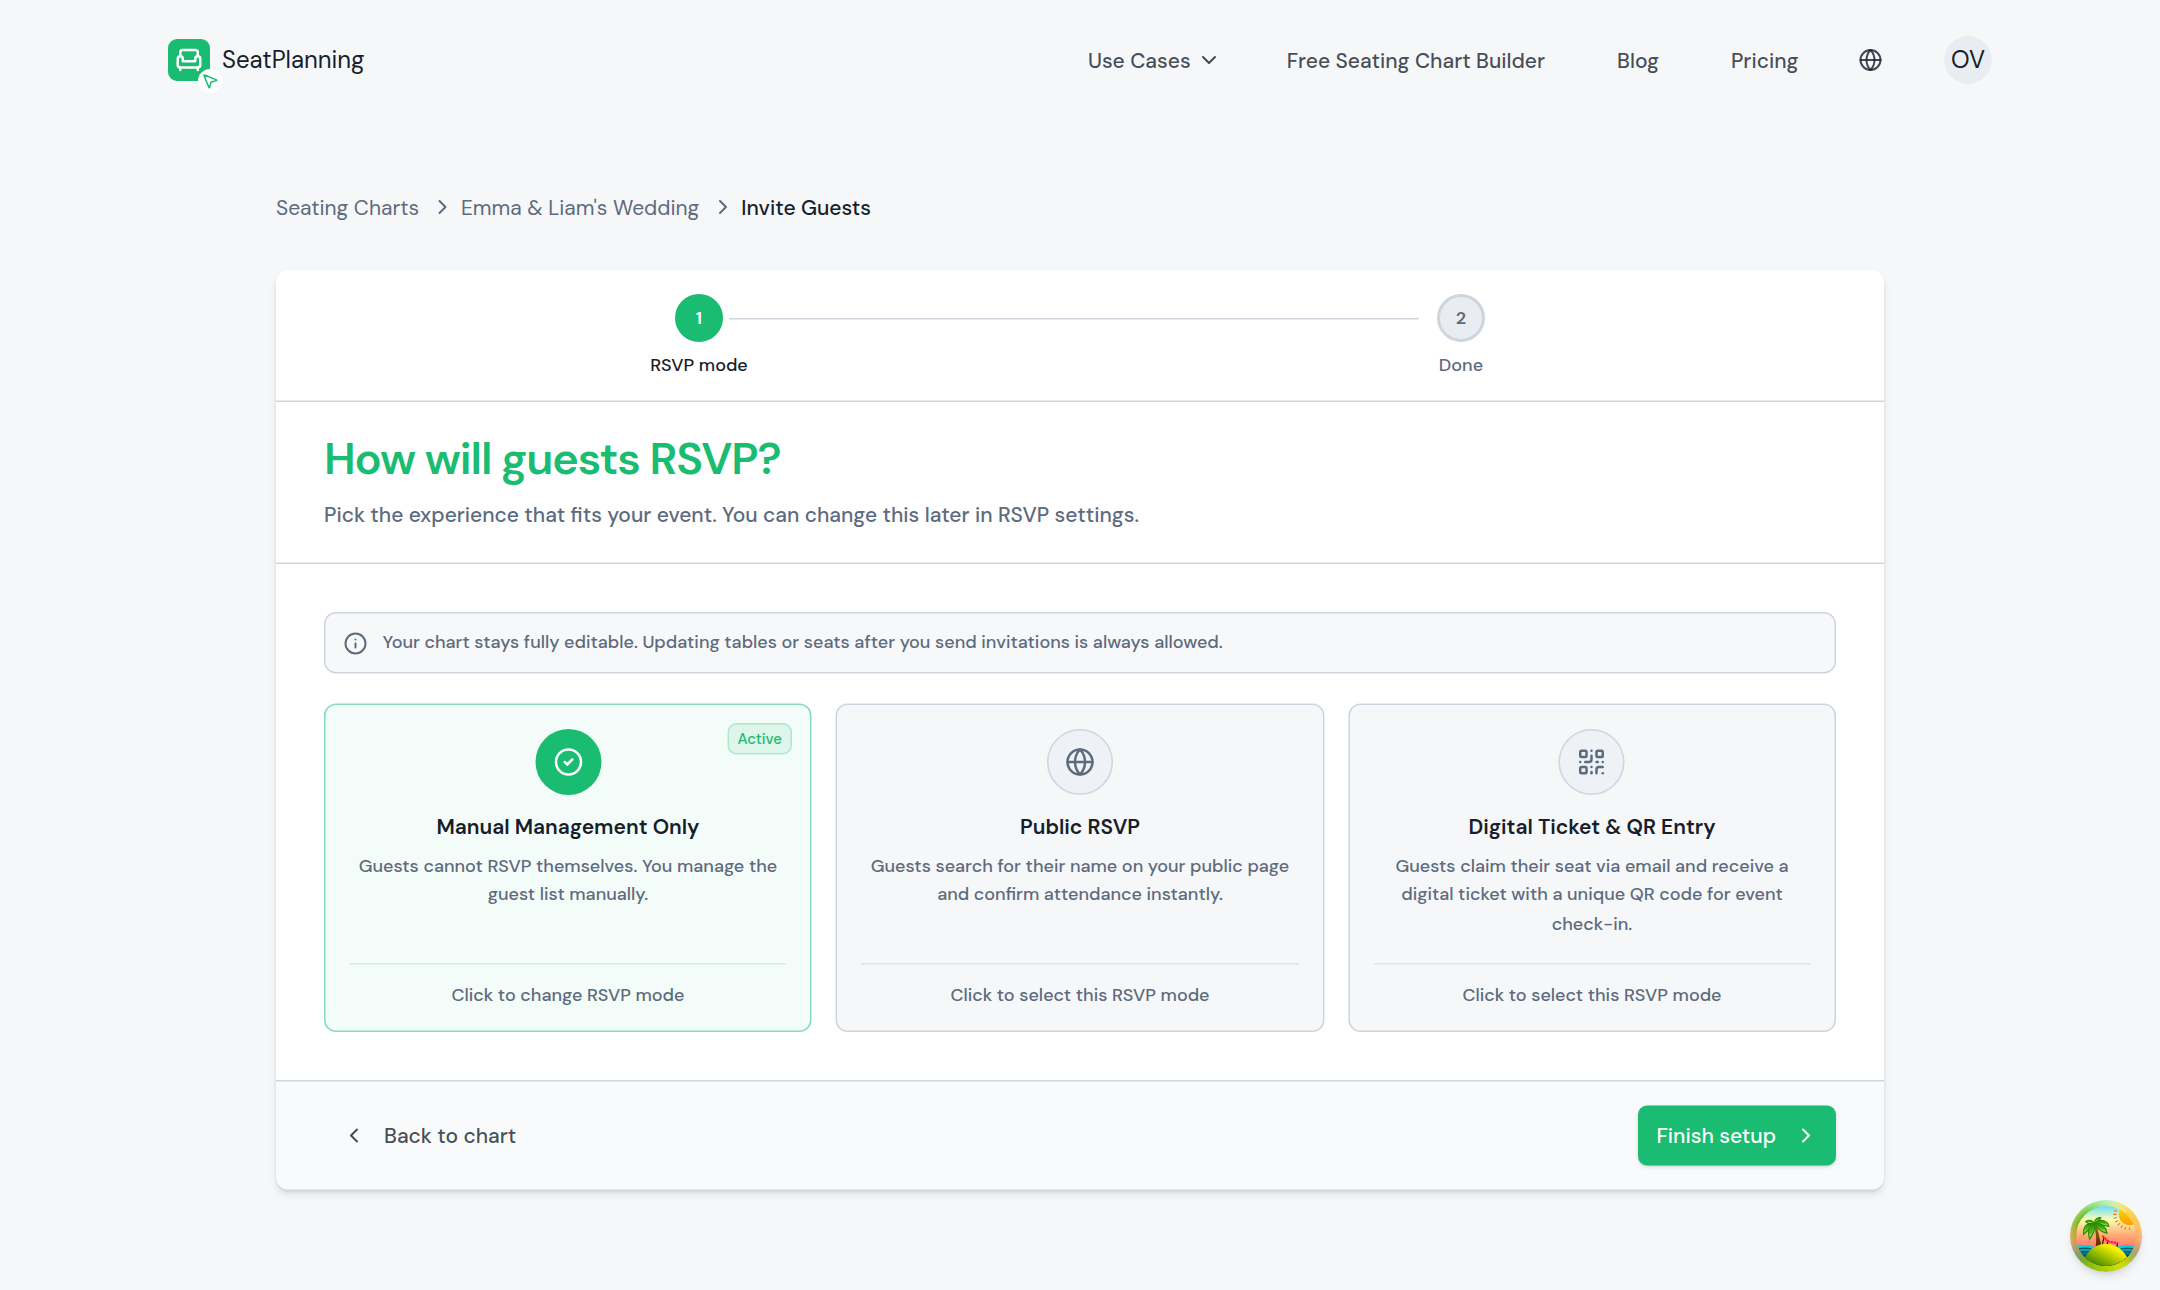
- 1Wähle zuerst, wie Gäste antworten sollen.
- 2Wähle einen Modus und fahre mit dem Versand fort.
Bevor du startest
- Dein Tarif muss E-Mail-Einladungen enthalten. Ist die Option gesperrt, zeigt dir die Preisseite, was sie freischaltet.
- Der RSVP-Modus deines Sitzplans muss Selbstbedienungs-RSVP oder Digitales Ticket & QR-Einlass sein. Nur manuelle Verwaltung hat keine RSVP-Seite, auf die Gäste antworten könnten, also auch nichts, wozu du sie einladen könntest.
- Gäste brauchen eine E-Mail-Adresse an ihrem Sitzplatz. Das ist die einzige Quelle für Empfänger, es lohnt sich also, deine Gästeliste vor dem Versand zu prüfen.
Schritt 1: Verfassen
Öffne E-Mail-Einladungen aus deinem Sitzplan und beginne beim Schritt Verfassen.
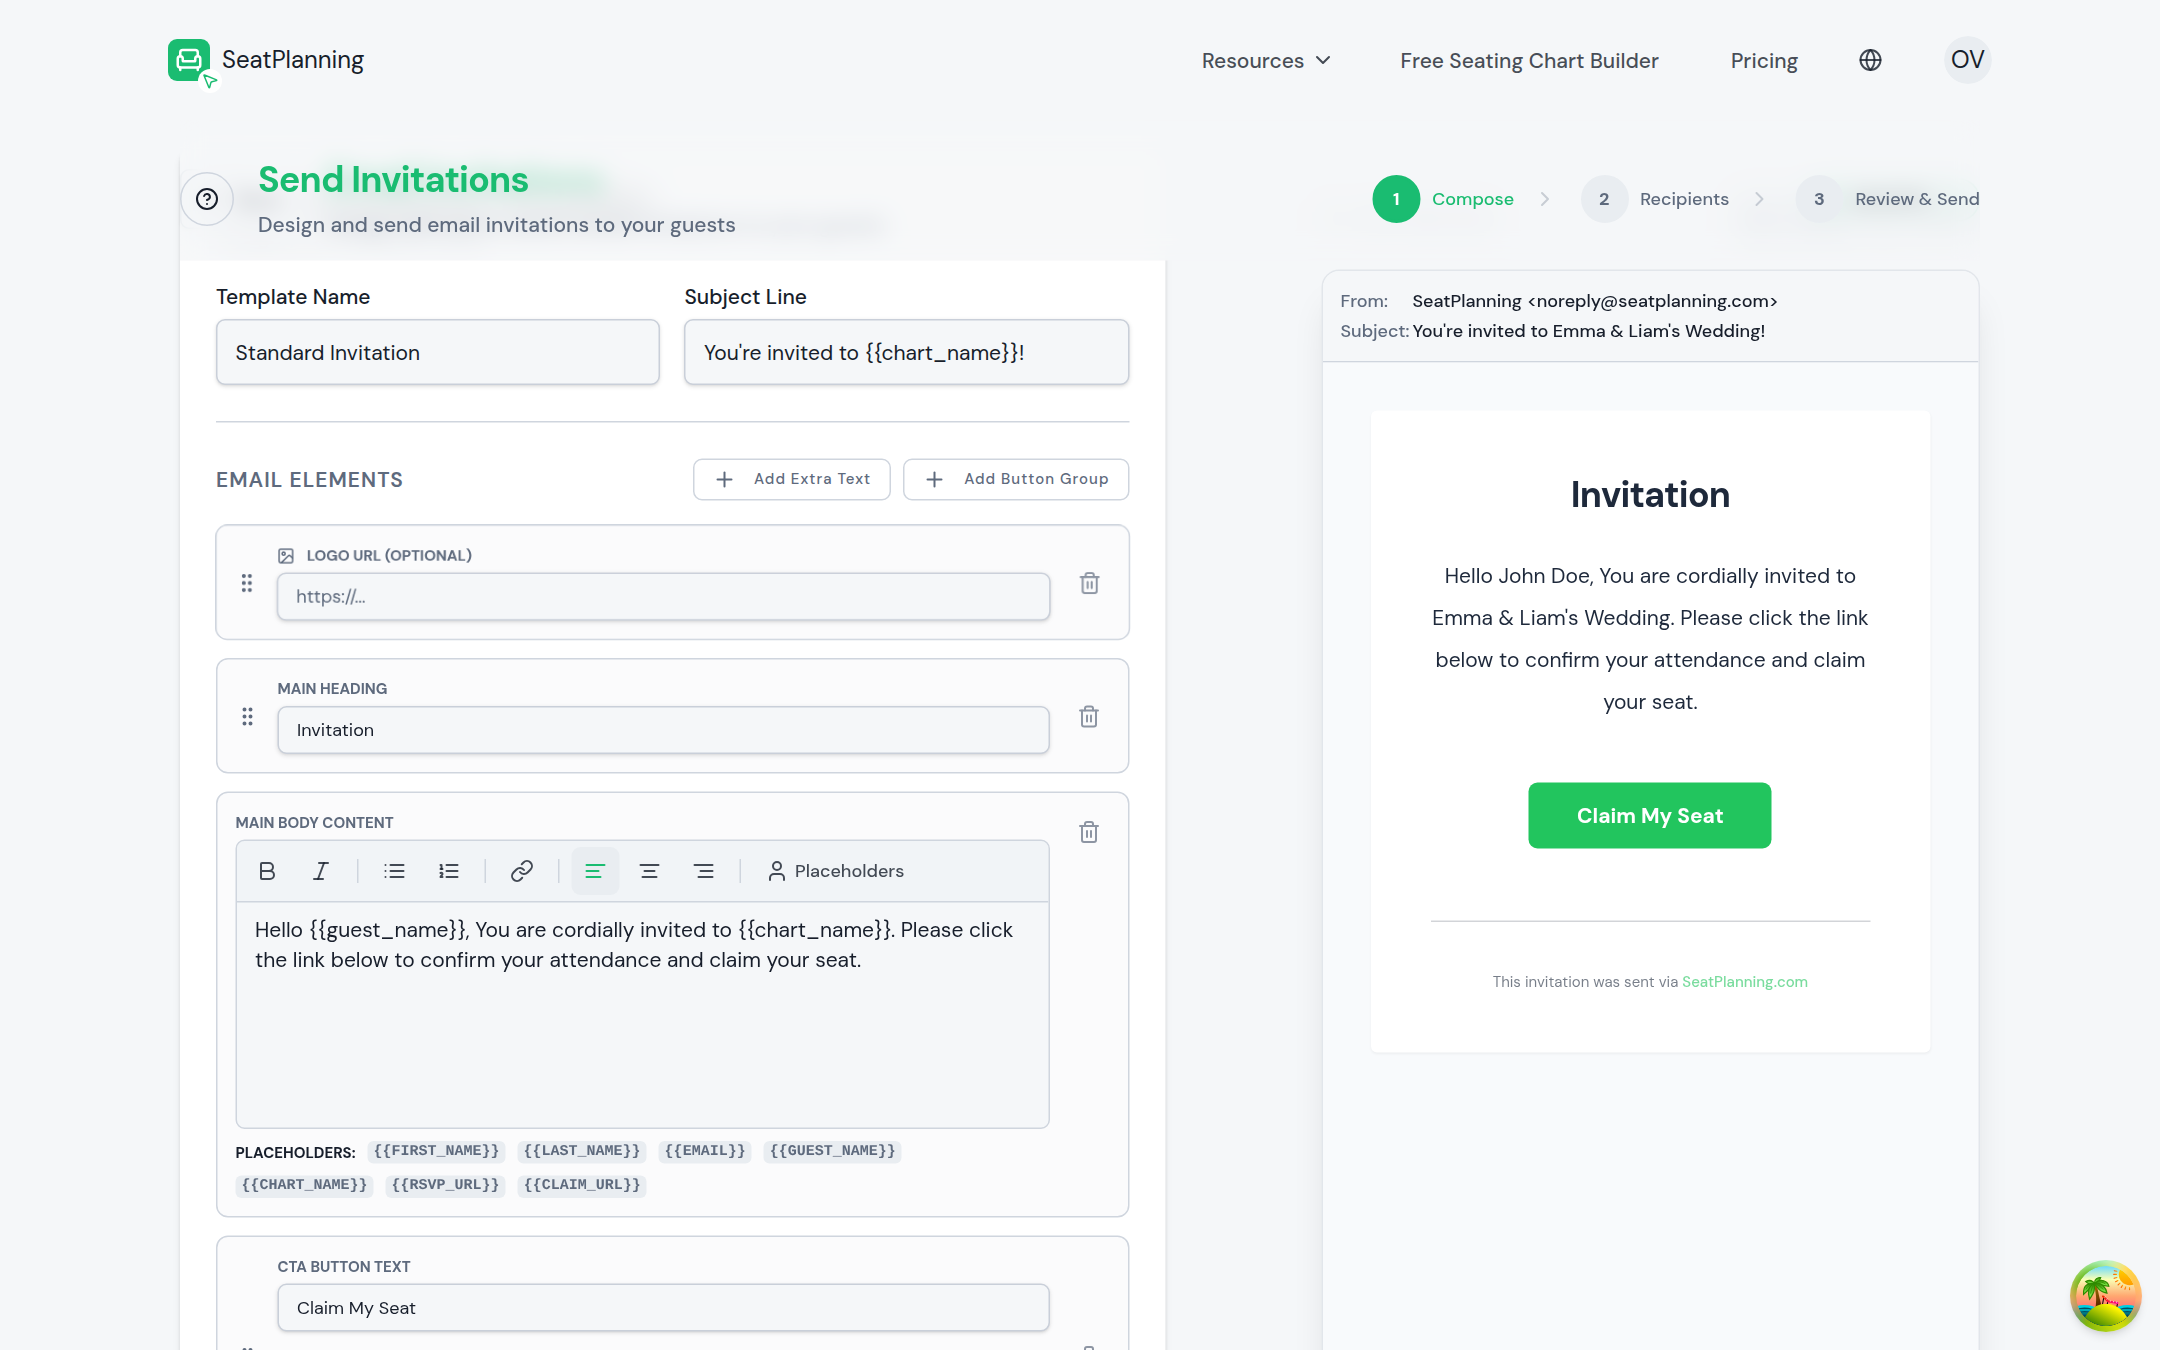
- 1Der Assistent läuft in drei Schritten: Verfassen, Empfänger, Überprüfen & Senden.
- 2Benenne die Vorlage und lege die Betreffzeile fest.
- 3Die Live-Vorschau zeigt genau, was Gäste erhalten.
- Lade eine gespeicherte Vorlage, oder starte mit der Standardvorlage für deinen RSVP-Modus.
- Passe Betreffzeile, Überschrift und Text an, wenn du den Wortlaut für diesen Versand ändern möchtest.
- Nutzt dein Sitzplan Digitales Ticket & QR-Einlass, lege unter Einladungslink läuft ab in fest, wie lange der Claim-Link eines Gastes gültig bleiben soll. Gäste müssen ihr Ticket vor Ablauf einlösen, und die Einstellung gilt nur für Einladungen, die du nach der Änderung versendest.
- Fahre fort, sobald die E-Mail in der Vorschau daneben passt.
Für alle Gestaltungsoptionen, Farben und Merge-Tags siehe Deine Einladungs-E-Mails gestalten.
Schritt 2: Empfänger wählen
Wähle im Schritt Empfänger eine Gruppe zum Senden:
- Nicht zugewiesene Plätze: Gäste, die noch keinem Tisch zugeteilt wurden.
- Plätze an Tischen: Gäste, die bereits einem Tisch in deinem Layout zugewiesen sind.
Jede Option zeigt, wie viele Sitzplätze infrage kommen und bei wie vielen davon eine E-Mail-Adresse fehlt und sie deshalb übersprungen werden. Ist diese Zahl höher als erwartet, öffne deine Sitzplatzliste und trage die fehlenden Adressen nach, bevor du sendest.
Im Modus Selbstbedienungs-RSVP erhält jeder Empfänger weiterhin seinen eigenen privaten Bestätigungslink, sodass niemand die Antwort eines anderen Gastes sieht. Wen du hier auswählst, steuert nur, wer eine E-Mail bekommt, nicht wer auf deinem teilbaren Link antworten darf, falls du einen separat erzeugt hast.
Schritt 3: Überprüfen und senden
Der letzte Schritt fasst zusammen, was gleich verschickt wird: wie viele Empfänger, welche Vorlage, die Betreffzeile und wohin der Button in deiner E-Mail führt. In beiden Modi, Selbstbedienungs-RSVP und QR, ist das der eigene private Claim-Link jedes Gastes, automatisch für jeden Empfänger erzeugt.
Der Versand erfolgt sofort und lässt sich nicht rückgängig machen, wirf also einen genauen Blick auf die Zusammenfassung, bevor du bestätigst. Wenn du bereit bist, wähle Einladungen senden.
Was nach dem Versand passiert
Deine Einladungen werden sofort verschickt, du kannst die Seite also schließen und weiterarbeiten. Erreichst du ein monatliches, tägliches oder Versand-Limit, sagt dir der Assistent, welches das ist und was als Nächstes zu tun ist. Siehe E-Mail-Versandkontingente für die Bedeutung dieser Meldungen.
Wie es weitergeht
- Deine Einladungs-E-Mails gestalten, um Aussehen und Wortlaut deiner E-Mails zu ändern.
- E-Mail-Versandkontingente, wenn du einen großen Versand planst.
- Antworten verfolgen und deine Gästeliste filtern, um zu sehen, wer nach dem Versand geantwortet hat.